云崽bot基础搭建过程记录

collectcrop Lv3

云崽bot基础搭建过程记录

突发奇想想要搭建一个qqbot玩玩,经同学推荐,准备从最简单的yunzai框架入手。

安装

环境准备:Windows/Linux/MacOS/Android Node.js(>=v21), Redis, Git

redis安装
  • 下载地址redis,密码:114514

  • 解压后启动redis-server.exe这个文件。

  • 将redis-server.exe所在的目录添加进环境变量,这样yunzai启动时会自动找到redis并启动

nodejs安装

nodejs中文网

  • windows操作系统的话直接下64位msi文件一键安装就行了
  • linux的话下下来是一个.tar.xz文件,tar -xvf xxx.tar.xz就能够解压出来,然后把./bin/目录放到环境变量里去就行,export PATH=/path/to/node-v20.18.0-linux-x64/bin:$PATH,不想每次都重新设置环境变量就直接在~/.bashrc中加这一行命令
git安装
  • windows:https://git-scm.com/downloads/win
  • linux:sudo apt update | sudo apt install git
yunzai本体安装

有了如上几个必选项后

1
2
git clone --depth 1 https://gitee.com/TimeRainStarSky/Yunzai
cd Yunzai

启动

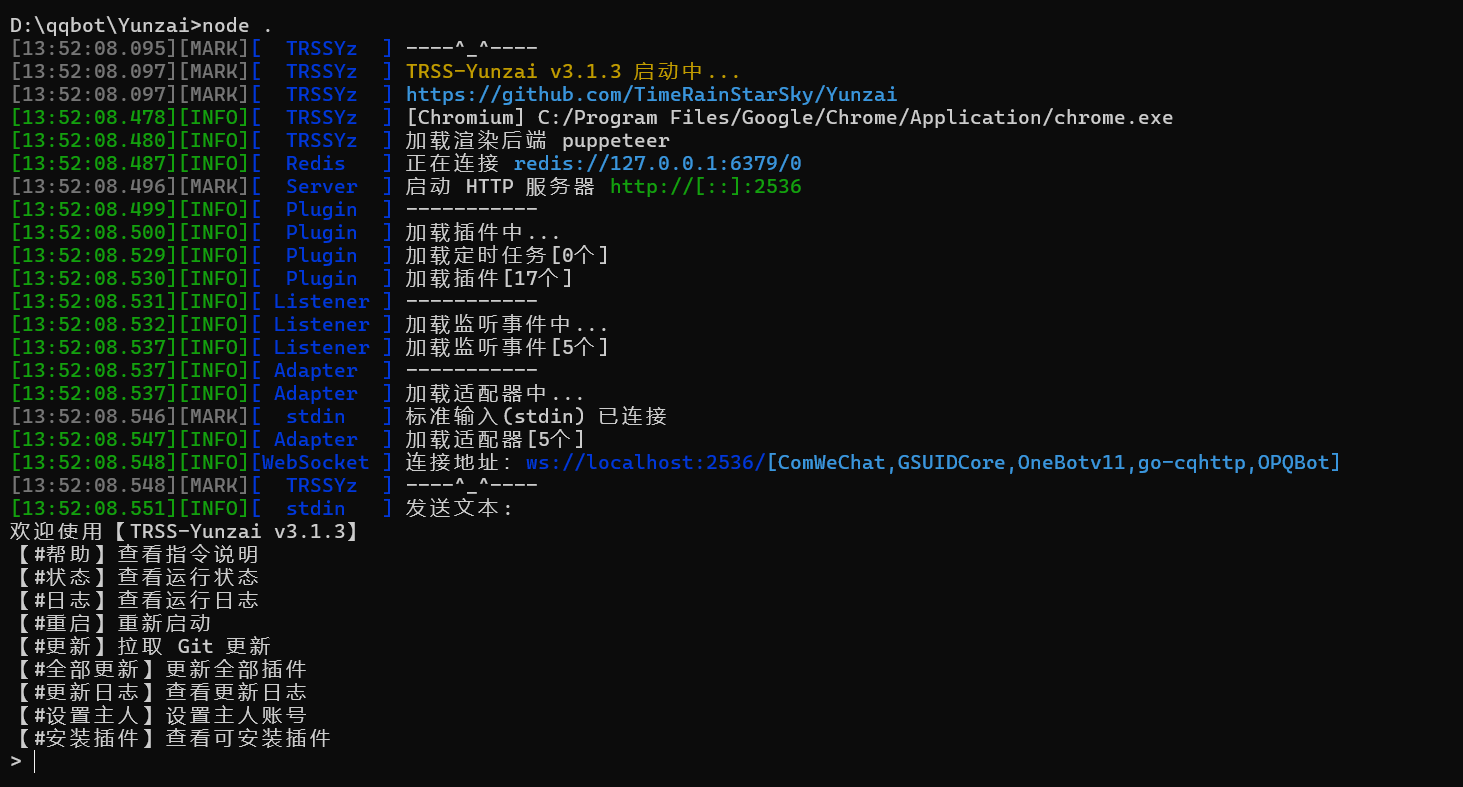
在yunzai目录下启动:

1
node .

启动协议端

“协议端” 是指实现 QQ 通信协议的服务组件。不同的协议端提供了不同的功能和适配方式,例如:

  • OneBot v11:支持标准化的 OneBot 协议,可以与多种第三方服务交互。
  • ComWeChat:通过仿 QQ 客户端的方式实现通信。
  • GSUIDCoreOPQBot:各自提供不同的兼容特性和扩展。

这些协议端负责处理与 QQ 的连接(包括登录、消息收发等),为机器人提供基础的通信能力。

启动协议端的目的是:

  • 连接到 QQ 服务器并登录指定的 QQ 账号。
  • 监听来自 QQ 的消息(例如群聊消息、私聊消息等)。
  • 转发消息到 Yunzai-Bot 的核心逻辑,进行处理。
  • 将 Yunzai-Bot 处理后的响应结果(如回复消息)发送回 QQ。

账号绑定

协议端绑定

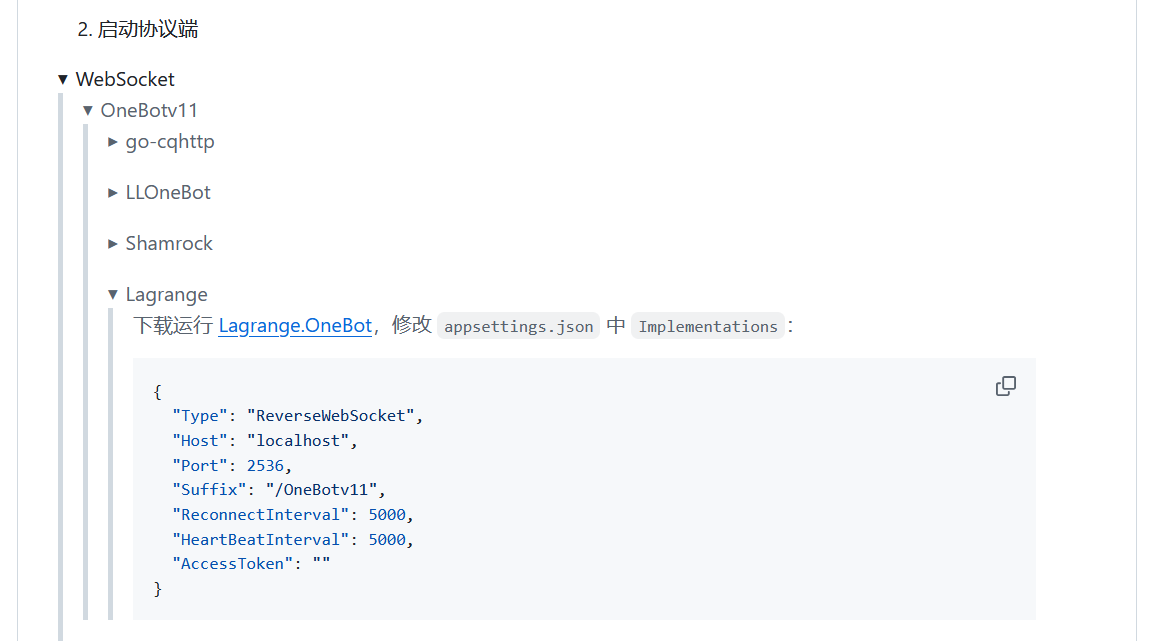
我们选用OneBotv11作为协议端,下载并运行Lagrange.OneBot后改配置,这里实际上是配置了一个反向 WebSocket 连接,而在yunzai/config/config/bot.yaml中实际有指定服务器开放的端口为2536,所以我们要在协议端开放2536端口。

修改过后大概长这样:

1
2
3
4
5
6
7
8
9
10
11
12
13
14
15
16
17
18
19
20
21
22
23
24
25
26
27
28
29
30
31
32
33
34
35
36
37
{
"Logging": {
"LogLevel": {
"Default": "Information",
"Microsoft": "Warning",
"Microsoft.Hosting.Lifetime": "Information"
}
},
"SignServerUrl": "",
"SignProxyUrl": "",
"MusicSignServerUrl": "",
"Account": {
"Uin": 0,
"Password": "",
"Protocol": "Linux",
"AutoReconnect": true,
"GetOptimumServer": true
},
"Message": {
"IgnoreSelf": true,
"StringPost": false
},
"QrCode": {
"ConsoleCompatibilityMode": false
},
"Implementations": [
{
"Type": "ReverseWebSocket",
"Host": "127.0.0.1",
"Port": 2536,
"Suffix": "/OneBotv11",
"ReconnectInterval": 5000,
"HeartBeatInterval": 5000,
"AccessToken": ""
}
]
}

其中Lagrange.OneBot在配置改完后按任意键继续时,会出现一个二维码。这时我们拿自己的qq小号(bot)扫码就可以登录进去了。之后我们在yunzai的主程序中就看到了连接建立

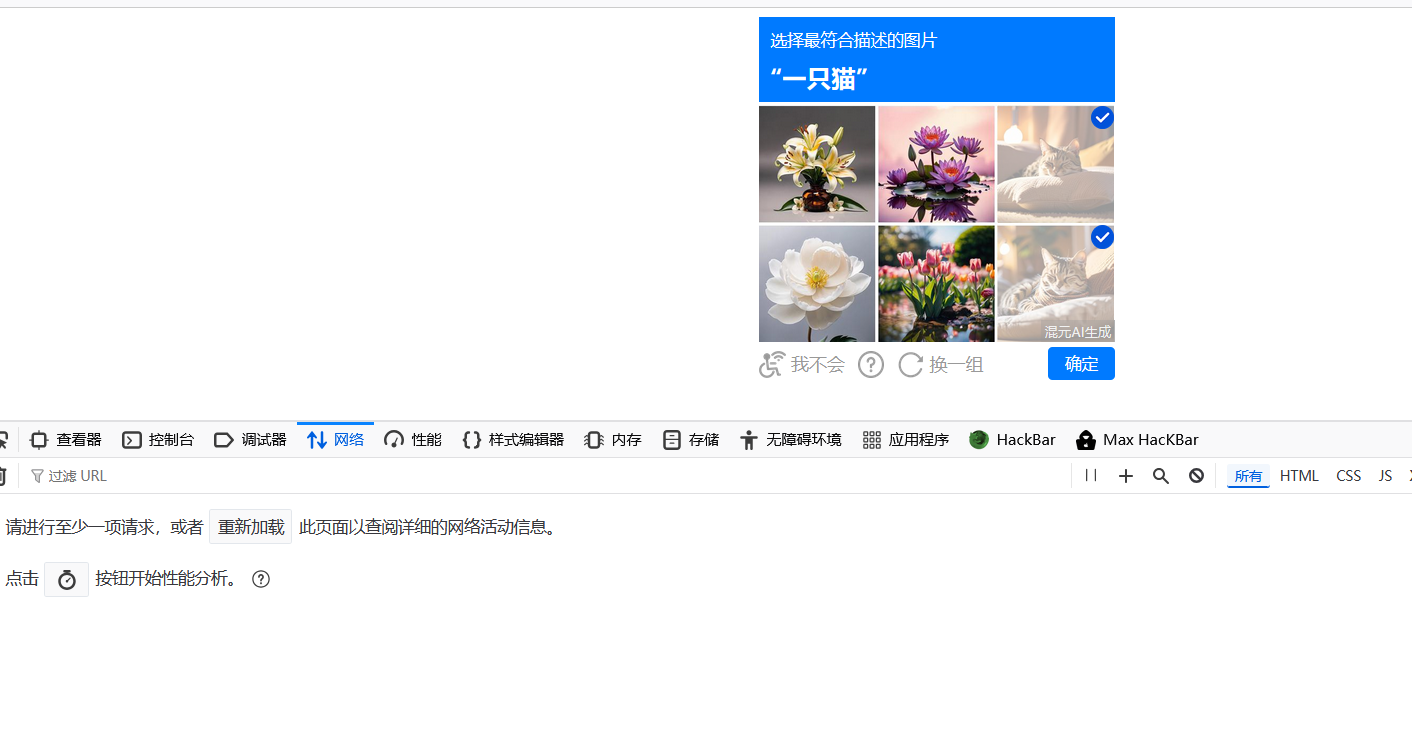
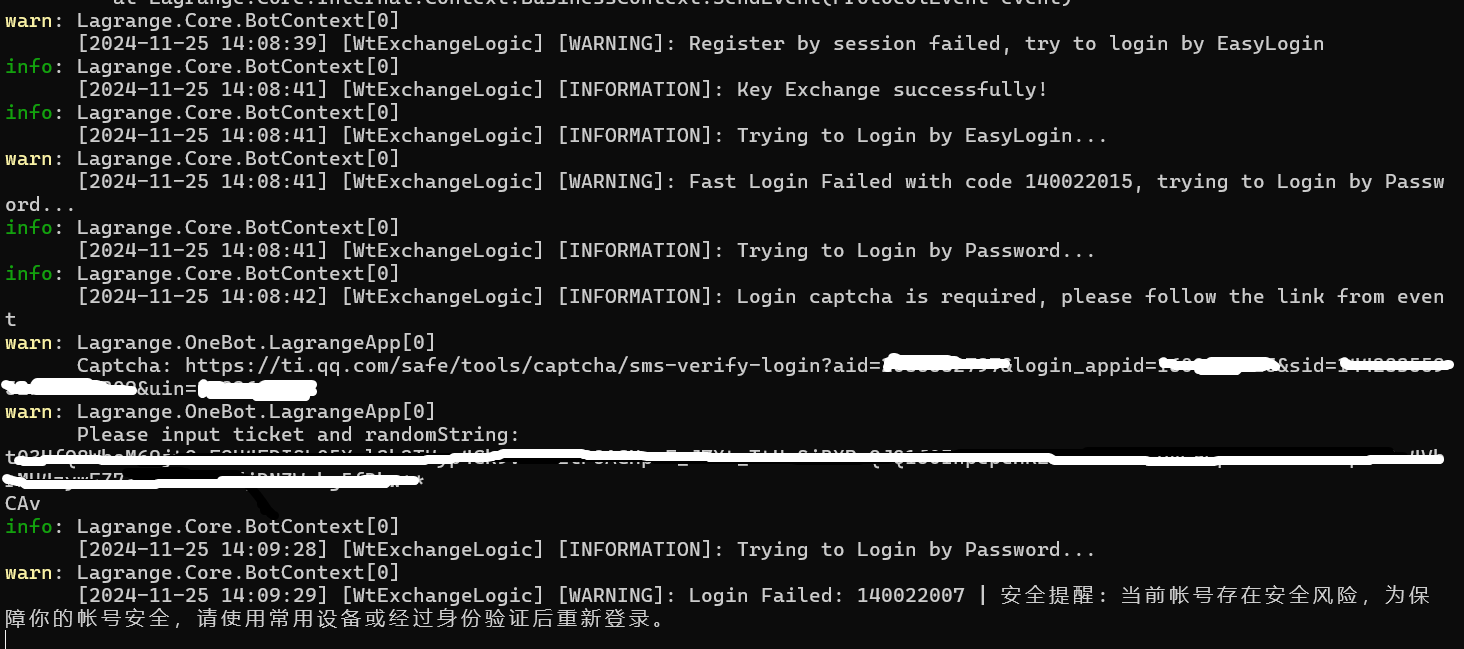
但有时候登录时会显示需要Captcha认证,需要输入tickettoken,这时候我们需要到提供的网址处去手动验证,并抓包查看对应的tickettoken

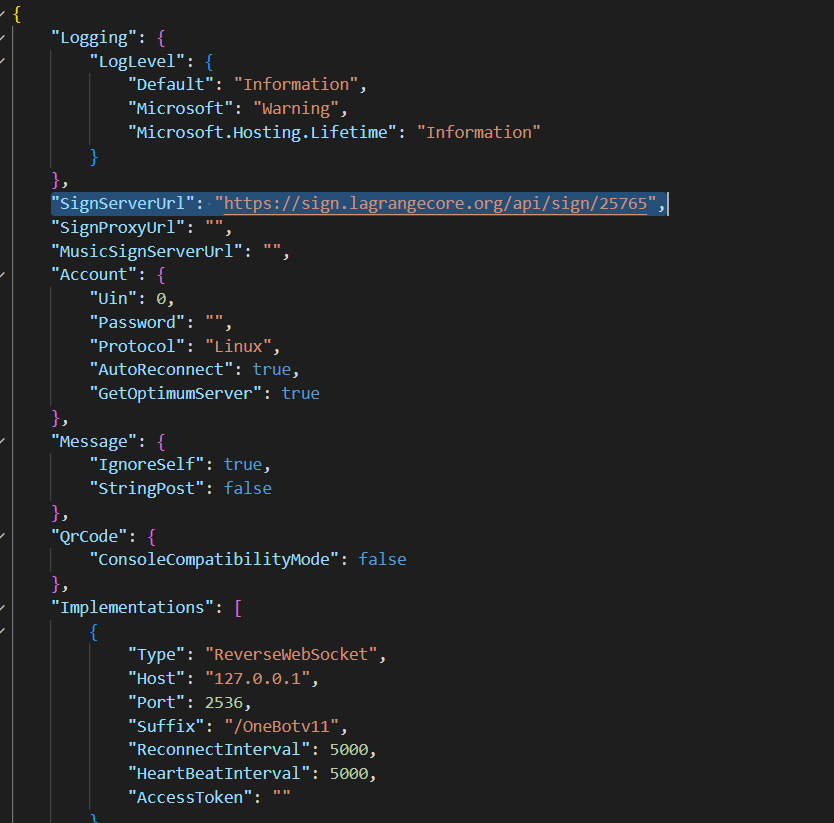
然后可以分别输入ticket和token。之后如果还是显示安全风险无法登录,可以在appsettings.json中加入"SignServerUrl": "https://sign.lagrangecore.org/api/sign/25765"这么一条配置,用来获取签名。
如果还是显示安全风险,可以到签名服务器文档中找一个别的签名服务器换上。实在不行,可以把当前目录下除了Lagrange.OneBot.exeappsettings.json全部删除了重新启动。

设置主人

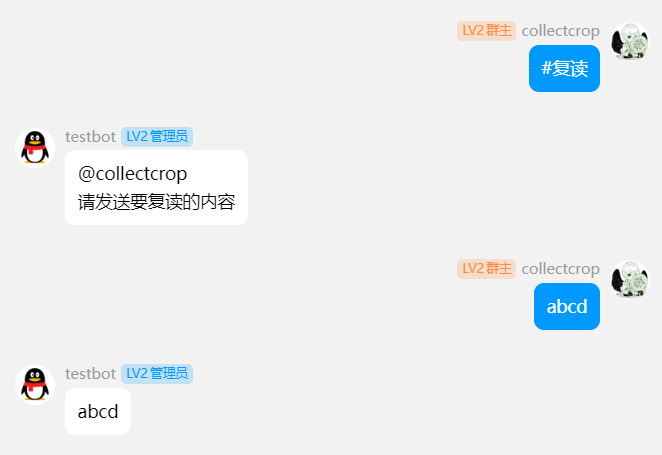
之后我们发现yunzai/plugins/example中有个主动复读.js文件,里面实现的内容就是匹配到#复读就进行复读,可以用来进行测试。

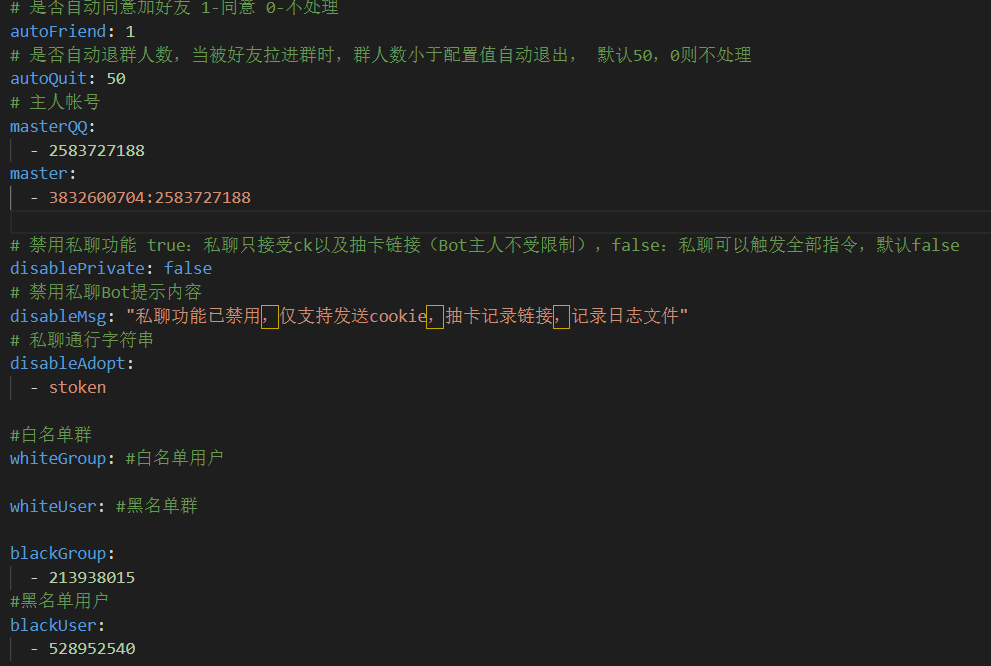
然后就给bot私发#设置主人就能够获取权限。
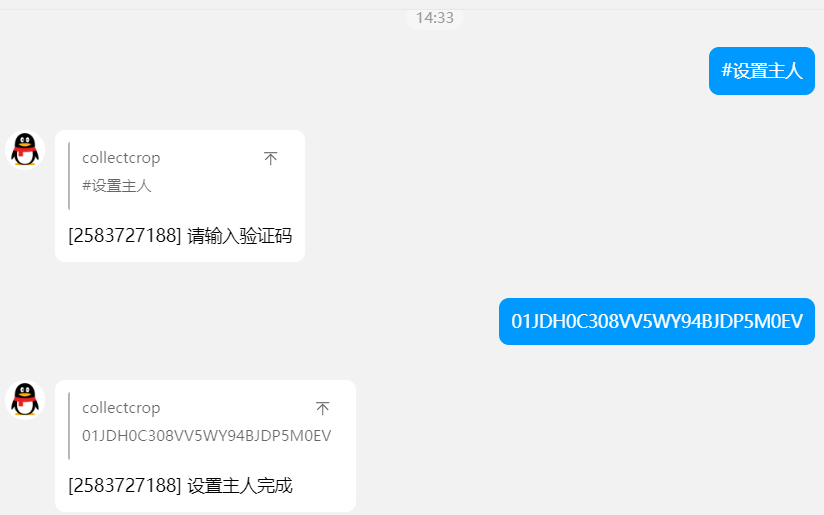
当然也可以直接改yunzai/config/config/other.yaml中的masterQQ以及master进行配置。其中master的格式是

bot qq:master qq

插件安装

插件大全

插件里提供了各式不同类型的功能,在yunzai bot运行时,会自动加载yunzai/plugins目录下的各个插件目录。

新的插件可以自己进行编写,存在插件目录下,也可以github和gitee上找新插件下载,大体有以下几种方式进行安装。

自带指令

一般能装一些最常用的插件

1
#安装TRSS-Plugin
curl

可以方便下载gitee上一些插件

1
curl -o "./plugins/example/定时群发.js" "https://gitee.com/batvbs/Miao-Yunzai-batvbs/raw/master/定时群发.js"

基础功能测试及编写

./plugin/example目录下的主动复读.js为例

1
2
3
4
5
6
7
8
9
10
11
12
13
14
15
16
17
18
19
20
21
22
23
24
25
26
27
28
29
30
31
32
33
34
35
36
export class example2 extends plugin {
constructor() {
super({
name: "复读",
dsc: "复读用户发送的内容,然后撤回",
/** https://oicqjs.github.io/oicq/#events */
event: "message",
priority: 5000,
rule: [
{
/** 命令正则匹配 */
reg: "^#复读$",
/** 执行方法 */
fnc: "repeat",
permission: "master",
}
]
})
}

/** 复读 */
async repeat() {
/** 设置上下文,后续接收到内容会执行doRep方法 */
this.setContext("doRep")
/** 回复 */
return this.reply("请发送要复读的内容", false, { at: true })
}

/** 接受内容 */
doRep() {
/** 结束上下文 */
this.finish("doRep")
/** 复读内容 */
return this.reply(this.e.message, false, { recallMsg: 5 })
}
}

首先是继承了plugin父类。各个参数的含义见注释。

1
2
3
4
5
6
7
8
9
10
11
12
13
14
15
16
17
18
19
20
21
22
23
24
25
26
27
28
29
30
31
32
33
34
35
36
37
38
39
40
41
42
43
export default class plugin {
/**
* @param name 插件名称
* @param dsc 插件描述
* @param handler handler配置
* @param handler.key handler支持的事件key
* @param handler.fn handler的处理func
* @param namespace namespace,设置handler时建议设置
* @param event 执行事件,默认message
* @param priority 优先级,数字越小优先级越高
* @param rule
* @param rule.reg 命令正则
* @param rule.fnc 命令执行方法
* @param rule.event 执行事件,默认message
* @param rule.log false时不显示执行日志
* @param rule.permission 权限 master,owner,admin,all
* @param task
* @param task.name 定时任务名称
* @param task.cron 定时任务cron表达式
* @param task.fnc 定时任务方法名
* @param task.log false时不显示执行日志
*/
constructor({
name = "your-plugin",
dsc = "无",
handler,
namespace,
event = "message",
priority = 5000,
task = { name: "", fnc: "", cron: "" },
rule = []
})
........
/**
* @param msg 发送的消息
* @param quote 是否引用回复
* @param data.recallMsg 群聊是否撤回消息,0-120秒,0不撤回
* @param data.at 是否at用户
*/
reply(msg = "", quote = false, data = {}) {
if (!this.e?.reply || !msg) return false
return this.e.reply(msg, quote, data)
}

然后会调用自定义实现的func函数,在setcontext之后,后续收到的消息会将程序执行流转到另一个自定义的函数doRep。最终bot实际发送消息是用this.reply这个接口实现的,在父类中看,调用了e对象中的reply。

e对象结构

我们要想稍微深入一点理解执行过程,就首先得知道this.e是个什么对象。我们可以加一个console.log来在日志中记录这个e的具体结构。加上之后给bot发#复读看看结构。

1
2
3
4
5
6
7
8
9
10
11
12
13
14
15
16
17
18
19
20
21
22
23
24
25
26
27
28
29
30
31
32
33
34
35
36
37
38
39
40
41
42
43
44
45
46
47
48
49
50
51
52
53
54
55
56
57
58
59
60
61
62
63
64
65
66
67
68
69
70
71
72
73
74
75
76
77
78
79
80
81
82
83
84
85
86
87
88
89
90
91
92
93
94
95
96
97
98
99
100
101
102
103
104
105
106
107
108
109
110
111
112
113
114
115
116
117
118
119
120
121
122
123
124
125
126
127
128
129
130
131
132
133
134
135
136
137
138
139
140
141
142
<ref *1> {
message_type: 'group',
sub_type: 'normal',
message_id: 32652067,
group_id: 1003519385,
user_id: 2583727188,
anonymous: null,
message: [ { text: '#复读', type: 'text' } ],
raw_message: '#复读',
font: 0,
sender: {
user_id: 2583727188,
nickname: 'collectcrop',
card: 'collectcrop',
sex: 'unknown',
age: 0,
area: '',
level: '2',
role: 'owner',
title: ''
},
time: 1732547237,
self_id: 3832600704,
post_type: 'message',
raw: '{"message_type":"group","sub_type":"normal","message_id":32652067,"group_id":1003519385,"user_id":2583727188,"anonymous":null,"message":[{"type":"text","data":{"text":"#\\u590D\\u8BFB"}}],"raw_message":"#\\u590D\\u8BFB","font":0,"sender":{"user_id":2583727188,"nickname":"collectcrop","card":"","sex":"unknown","age":0,"area":"","level":"2","role":"owner","title":""},"time":1732547237,"self_id":3832600704,"post_type":"message"}',
bot: {
adapter: OneBotv11Adapter {
id: 'QQ',
name: 'OneBotv11',
path: 'OneBotv11',
echo: {},
timeout: 60000
},
ws: WebSocket {
_events: [Object: null prototype],
_eventsCount: 3,
_maxListeners: undefined,
_binaryType: 'nodebuffer',
_closeCode: 1006,
_closeFrameReceived: false,
_closeFrameSent: false,
_closeMessage: <Buffer >,
_closeTimer: null,
_errorEmitted: false,
_extensions: {},
_paused: false,
_protocol: '',
_readyState: 1,
_receiver: [Receiver],
_sender: [Sender],
_socket: [Socket],
_autoPong: true,
_isServer: true,
rid: '::ffff:127.0.0.1:52599-dldWBbcOj0mF9sQR9Mpc6g==',
sid: 'ws://127.0.0.1:2536/OneBotv11',
sendMsg: [Function (anonymous)],
[Symbol(shapeMode)]: false,
[Symbol(kCapture)]: false
},
sendApi: [Function: sendApi],
stat: {
start_time: 1732545494,
stat: {},
lost_pkt_cnt: [Getter],
lost_times: [Getter],
recv_msg_cnt: [Getter],
recv_pkt_cnt: [Getter],
sent_msg_cnt: [Getter],
sent_pkt_cnt: [Getter],
app_initialized: true,
app_enabled: true,
app_good: true,
online: true,
good: true
},
model: 'TRSS Yunzai ',
info: { user_id: 3832600704, nickname: 'testbot' },
uin: [Getter],
nickname: [Getter],
avatar: [Getter],
setProfile: [Function: setProfile],
setNickname: [Function: setNickname],
setAvatar: [Function: setAvatar],
pickFriend: [Function: pickFriend],
pickUser: [Getter],
getFriendArray: [Function: getFriendArray],
getFriendList: [Function: getFriendList],
getFriendMap: [Function: getFriendMap],
fl: Map(3) {
66600000 => [Object],
2583727188 => [Object],
3832600704 => [Object]
},
pickMember: [Function: pickMember],
pickGroup: [Function: pickGroup],
getGroupArray: [Function: getGroupArray],
getGroupList: [Function: getGroupList],
getGroupMap: [Function: getGroupMap],
getGroupMemberMap: [Function: getGroupMemberMap],
gl: Map(1) { 1003519385 => [Object] },
gml: Map(1) { 1003519385 => [Map] },
request_list: [],
getSystemMsg: [Function: getSystemMsg],
setFriendAddRequest: [Function: setFriendAddRequest],
setGroupAddRequest: [Function: setGroupAddRequest],
cookies: { 'aq.qq.com': undefined },
getCookies: [Function: getCookies],
getCsrfToken: [Function: getCsrfToken],
guild_info: null,
clients: undefined,
version: {
app_name: 'Lagrange.OneBot',
app_version: '0.0.3',
protocol_version: 'v11',
nt_protocol: 'Linux | 3.2.10-25765',
id: 'QQ',
name: 'OneBotv11',
version: [Getter]
},
bkn: 202881165
},
group_name: 'testbot、collec...',
adapter_id: 'QQ',
adapter_name: 'OneBotv11',
reply: [AsyncFunction (anonymous)],
msg: '#复读',
logText: '\x1B[36m[testbot、collec...(1003519385), collectcrop(2583727188)]\x1B[39m\x1B[31m[#复读]\x1B[39m',
isGroup: true,
recall: [Function: bound recallMsg],
isMaster: true,
runtime: Runtime {
e: [Circular *1],
_mysInfo: {},
handler: {
has: [Function: has],
call: [AsyncFunction: call],
callAll: [AsyncFunction: callAll]
}
},
original_msg: '#复读',
logFnc: '\x1B[34m[复读(repeat)]\x1B[39m'
}
核心信息
  • message_type: 表示消息类型。
    • "group": 群聊消息。
    • "private": 私聊消息。
  • sub_type: 子类型。
    • 对于群聊消息,常见值是 "normal",表示普通消息。
  • message_id: 消息 ID,可用于引用或撤回这条消息。
  • group_id: 群号,仅当消息类型是 "group" 时存在。
  • user_id: 发送者的 QQ 号。
  • message: 消息的具体内容,数组形式,每个元素是一个对象,表示消息的组成部分。
    • 示例: [ { text: '#复读', type: 'text' } ]
  • raw_message: 消息的原始内容,字符串形式。
    • 示例: "#复读"
  • sender: 发送者信息,包含以下字段:
    • user_id: 发送者 QQ 号。
    • nickname: 昵称。
    • card: 群名片。
    • sex: 性别,值可能是 "male""female""unknown"
    • level: 群等级。
    • role: 群内角色,可能是 "owner"(群主)、"admin"(管理员)或 "member"(普通成员)。

扩展信息
  • self_id: 机器人的 QQ 号。
  • post_type: 事件类型。
    • "message": 消息事件。
  • time: 发送时间的时间戳(Unix 时间)。
  • isGroup: 布尔值,表示消息是否来自群聊。
  • isMaster: 布尔值,表示发送者是否为插件配置的主人。

事件上下文管理
  • runtime: 插件运行时信息。
    • runtime.e: 当前事件对象(即 this.e 本身)。
    • 其他属性用于管理事件处理流程。
reply函数实现

同样的方式,用console.log(this.e.reply.toString());,能动态查看这个reply函数的源码。然后再在vscode里搜索一下,最后在loader.js中找到了对应代码。

1
2
3
4
5
6
7
8
9
10
11
12
13
14
15
16
17
18
19
20
21
22
23
24
25
26
27
28
29
30
31
32
33
34
35
36
37
38
39
40
41
42
43
44
45
46
47
e.reply = async (msg = "", quote = false, data = {}) => {
if (!msg) return false

let { recallMsg = 0, at = "" } = data

if (at && e.isGroup) {
if (at === true)
at = e.user_id
if (Array.isArray(msg))
msg.unshift(segment.at(at), "\n")
else
msg = [segment.at(at), "\n", msg]
}

if (quote && e.message_id) {
if (Array.isArray(msg))
msg.unshift(segment.reply(e.message_id))
else
msg = [segment.reply(e.message_id), msg]
}

let res
try {
res = await reply(msg)
} catch (err) {
Bot.makeLog("error", ["发送消息错误", msg, err], e.self_id)
res = { error: [err] }
}

if (recallMsg > 0 && res?.message_id) {
if (e.group?.recallMsg)
setTimeout(() => {
e.group.recallMsg(res.message_id)
if (e.message_id)
e.group.recallMsg(e.message_id)
}, recallMsg * 1000)
else if (e.friend?.recallMsg)
setTimeout(() => {
e.friend.recallMsg(res.message_id)
if (e.message_id)
e.friend.recallMsg(e.message_id)
}, recallMsg * 1000)
}

this.count(e, "send", msg)
return res
}
函数参数
1
async (msg = "", quote = false, data = {})
  • msg: 要发送的消息,默认值是空字符串。

  • quote: 是否引用消息(通常用于回复特定消息),默认值为 false

  • data: 一个对象,包含额外的选项,包括:

    • recallMsg: 是否自动撤回消息,单位是秒(默认值为 0,即不撤回)。
    • at: 是否 @ 某人。可以是用户 ID,也可以是 true(表示 @ 当前消息发送者)。

atquote 功能的处理

@ 功能 (at)

1
2
3
4
5
6
7
8
if (at && e.isGroup) {
if (at === true)
at = e.user_id
if (Array.isArray(msg))
msg.unshift(segment.at(at), "\n")
else
msg = [segment.at(at), "\n", msg]
}
  • 如果传入了 at且当前消息是群消息:

    • 如果 at === true,则默认 @ 当前用户 e.user_id
    • 如果消息内容是数组,会在数组前添加 @ 信息和换行符。
    • 如果消息是普通文本,则将消息包装成一个数组并加上 @ 信息。

引用消息 (quote)

1
2
3
4
5
6
if (quote && e.message_id) {
if (Array.isArray(msg))
msg.unshift(segment.reply(e.message_id))
else
msg = [segment.reply(e.message_id), msg]
}
  • 如果 quotetrue且当前事件中有 message_id

    • 在消息前添加一段引用内容(segment.reply(e.message_id))。
    • 类似 at 的逻辑,会将消息转换为数组格式。

消息发送与异常处理
1
2
3
4
5
6
7
let res
try {
res = await reply(msg)
} catch (err) {
Bot.makeLog("error", ["发送消息错误", msg, err], e.self_id)
res = { error: [err] }
}
  • 使用 reply(msg) 发送消息。
  • 如果发送失败,会捕获异常,并通过 Bot.makeLog 记录错误日志。

自动撤回消息
1
2
3
4
5
6
7
8
9
10
11
12
13
14
if (recallMsg > 0 && res?.message_id) {
if (e.group?.recallMsg)
setTimeout(() => {
e.group.recallMsg(res.message_id)
if (e.message_id)
e.group.recallMsg(e.message_id)
}, recallMsg * 1000)
else if (e.friend?.recallMsg)
setTimeout(() => {
e.friend.recallMsg(res.message_id)
if (e.message_id)
e.friend.recallMsg(e.message_id)
}, recallMsg * 1000)
}
  • 如果 recallMsg 大于 0 且成功发送了消息(res?.message_id存在):

    • 如果消息是在群聊中发送,调用 e.group.recallMsg 撤回消息。
    • 如果消息是在私聊中发送,调用 e.friend.recallMsg 撤回消息。
    • setTimeout 用来延迟 recallMsg 秒后执行撤回操作。

统计与返回
1
2
this.count(e, "send", msg)
return res
  • 调用 this.count 方法统计消息发送(如记录发送次数)。
  • 最后返回消息发送的结果 res

这样我们就可以尝试着手实现一个简单的功能改造了,这个自带的复读文件需要我们输入#复读,然后bot回应后我们再输入内容,bot才会复读该内容。那么我们可以尝试将其改造成一个我们@bot后输入复读xxx,然后bot复读xxx的一个功能插件。

在更改的过程中发现了一个严峻的问题,就是其rule中reg的正则匹配只返回了true或false,但并不能捕获分组。这里我们可以在函数体内部再进行一次正则表达的匹配,然后进行输出。

在测试中也发现,我们@bot的这个前缀实际不会出现在e.msg中,只用匹配后面的内容就行。

最终更改结果:

1
2
3
4
5
6
7
8
9
10
11
12
13
14
15
16
17
18
19
20
21
22
23
24
25
26
27
28
29
30
31
32
33
34
35
36
37
38
export class example2 extends plugin {
constructor() {
super({
name: "复读",
dsc: "复读用户发送的内容",
/** https://oicqjs.github.io/oicq/#events */
event: "message",
priority: 5000,
rule: [
{
/** 命令正则匹配 */
reg: "^复读:(.*)$",
/** 执行方法 */
fnc: "repeat",
permission: "all",
}
]
})
}

repeat = async () =>{
// const content = this.e.match[1].trim();
console.log(this.rule); // 打印 this.rule 的值
if (this.rule && this.rule[0] && this.rule[0].reg) {
this.rule[0].reg = new RegExp(this.rule[0].reg);
const match = this.rule[0].reg.exec(this.e.msg);
console.log(match);
if (match) {
const content = match[1].trim();
return this.reply(content, false, { at: true });
} else {
console.error("No match found");
}
} else {
console.error("rule or reg is undefined");
}
}
}
  • 标题: 云崽bot基础搭建过程记录
  • 作者: collectcrop
  • 创建于 : 2024-11-27 12:38:30
  • 更新于 : 2024-11-27 12:53:51
  • 链接: https://collectcrop.github.io/2024/11/27/云崽bot基础搭建过程记录/
  • 版权声明: 本文章采用 CC BY-NC-SA 4.0 进行许可。