从零开始搭建自制操作系统——中断管理
这里我们的目标是实现一个32位的操作系统,所以后面介绍相关的内容默认都是32位下的。
基本概念
IDT表
中断描述符表 ( IDT ) 用于告知 CPU中断服务程序(ISR) 的位置(每个中断向量对应一个)。它的结构类似于全局描述符表(GDT)。
IDT的结构是由 CPU 架构规范定义的,所以对于某一类 CPU(比如 x86),结构是固定的。IDT 的结构必须符合 CPU 要求,否则中断会失败。但是处理函数里要做什么,是操作系统自己决定的。
IDT 的位置保存在 IDTR ( IDT 寄存器)中。它使用 LIDT 汇编指令加载,该指令的参数是指向 IDT 描述符结构的指针,其结构类似于GDT表的指针的limit和base,其中Offset指的是IDT表的起始地址,而Size为IDT表的大小-1:
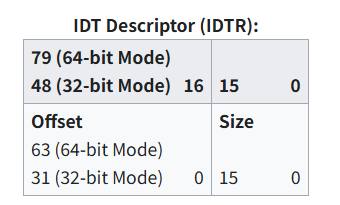
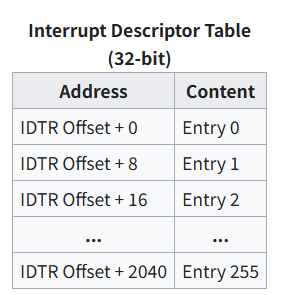
具体的表结构如下,IDTR Offset即上面我们给IDTR赋值的结构体的Offset域,每个表项占8个字节。
其中每一个entry的具体结构如下,IDT entries 也称为门。它可以包含中断门、任务门和陷阱门。
Interrupt Gate(中断门)
- 自动清除 IF(中断标志),防止其他中断嵌套进来(常用于硬件中断)
Trap Gate(陷阱门)
- 不会清除 IF,适合调试、系统调用等
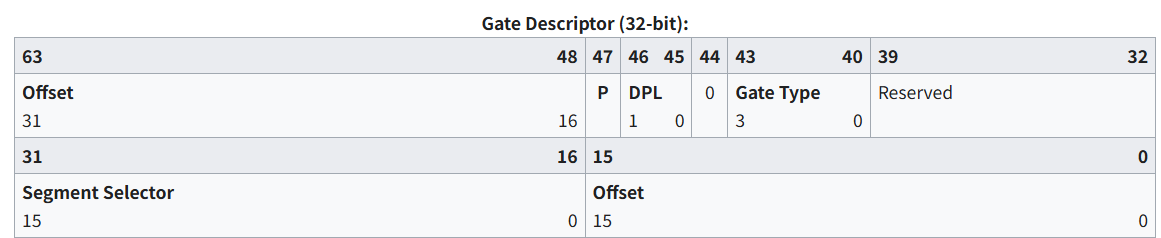
Offset:指向了ISR(Interrupt Service Routine)入口的起始地址。
Segment Selector:必须指向我们之前定义的GDT表中合法的代码段,在中断发生时 CPU 会使用它来加载代码段(CS寄存器),然后跳到指定的中断处理函数。比如我们之前定义的gdt表中第一个段描述符gdt_code,那么在中断发生时就会把Segment Selector设置为0x8。
Gate Type:描述了门的类型
- 0x5:任务门→ 进行任务切换
- 0x6:16bit中断门
- 0x7:16bit陷阱门
- 0xE:32bit中断门(现代常用)
- 0xF:32bit陷阱门
DPL:指定了特权级别,ring0-3
P:Present bit,必须设为
1才会被认为是一个有效的中断门。
一般系统调用会使用如下type_attr
1 | type_attr = 0x8E; // P=1, DPL=00, Type=1110 (32-bit Interrupt Gate) |
具体的idt代码定义如下:
1 | // idt.h |
中断向量
大多数平台上通常有三类中断:
异常 :这些异常由 CPU 内部生成,用于向正在运行的内核发出需要其注意的事件或情况的警报。在 x86 CPU 上,这些异常包括双重异常(Double Fault)、缺页异常(Page Fault)、通用保护异常(General Protection Fault)等。
中断请求 (IRQ) 或硬件中断 :此类中断由芯片组外部生成,并通过锁存相关 CPU 的 #INTR 引脚或等效信号来发出信号。目前常用的 IRQ 类型有两种。
IRQ 线路,或基于引脚的 IRQ :这些 IRQ 通常在芯片组上静态路由。线路从芯片组上的设备连接到 IRQ 控制器,该控制器将设备发送的中断请求序列化,并将它们逐个发送到 CPU,以防止争用。在许多情况下,IRQ 控制器会根据设备的优先级一次向 CPU 发送多个 IRQ。
消息信号中断 :这些中断通过向一个预留的内存位置写入值来发出信号,该位置用于存储中断设备、中断本身以及向量信息。设备会通过固件或内核软件分配一个写入位置。然后,设备会使用特定于设备总线的仲裁协议生成 IRQ。PCI 总线就是一个提供基于消息的中断功能的总线示例。
软件中断 :这是由 CPU 上运行的软件发出的中断信号,表示需要内核的关注。这类中断通常用于系统调用。在 x86 CPU 上,用于启动软件中断的指令是“INT”指令。由于 x86 CPU 可以使用 256 个可用中断向量中的任意一个来处理软件中断,因此内核通常会从中选择一个。例如,许多当代 Unix 系统在基于 x86 的平台上使用向量 0x80。
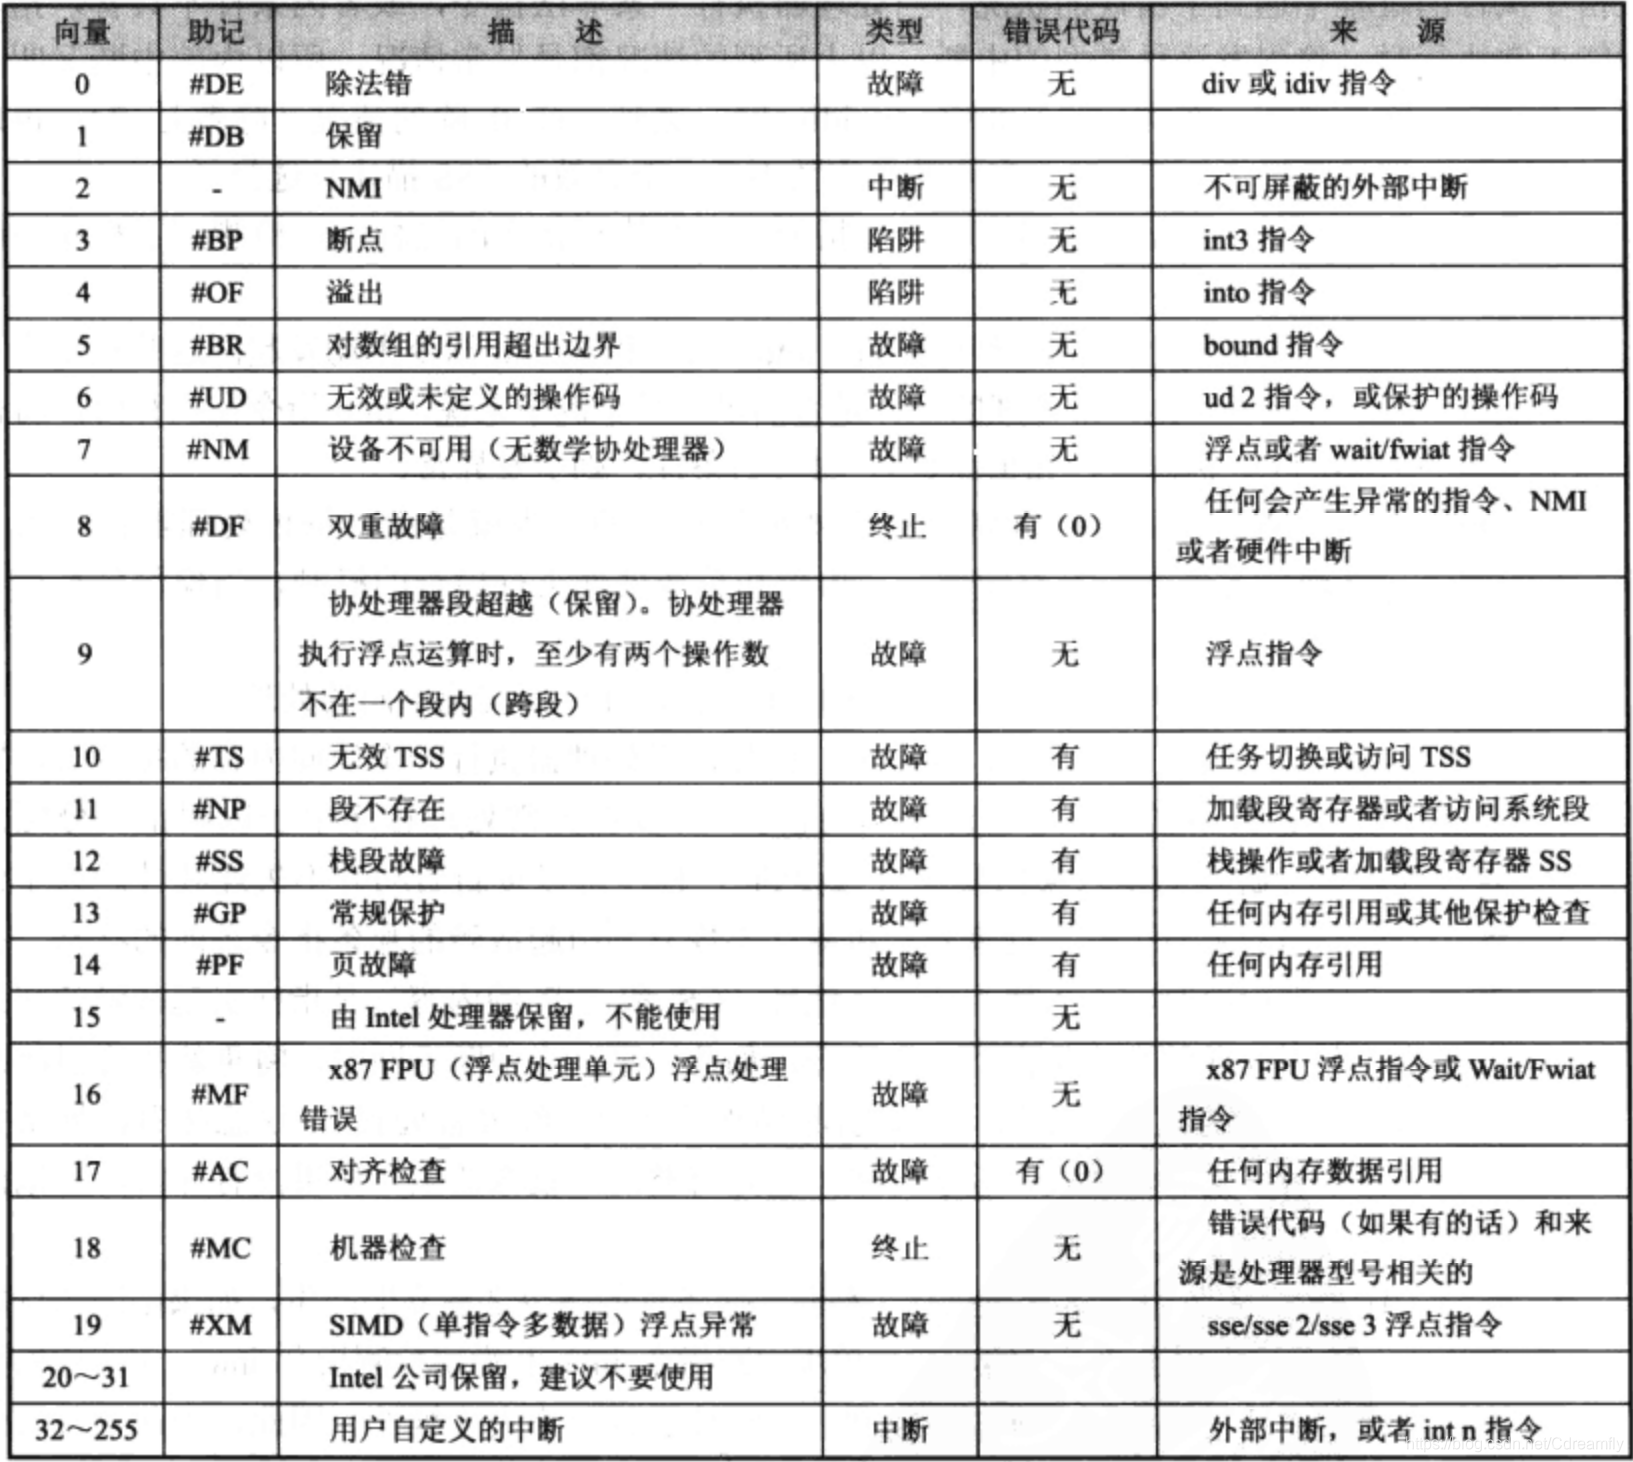
中断号由8个二进制位表示,范围在0-255,其中前32个中断(异常)是
CPU 固定写死的。比如除以0了,CPU 就会主动触发
中断 0。我们不能更改 CPU
生成的中断号。但我们可以“改响应方式”,比如说你在 IDT 表的第 0
项,挂一个你自己的 isr0 函数,去处理除零异常。但不能让 CPU
改为跳转到 IDT 第 9 项。
ISR(Interrupt Service Routines)
外部事件会触发中断——正常的控制流会被打断,并调用中断服务程序 (ISR)。可以说ISR
ISR 必须以操作码 iret
结尾,所以我们在用idt_set_gate设置某个IDT表项时,需要将base设置为一个以iret结束的函数,所以一般是写汇编来包装ISR,不能直接设置base为回调函数的地址。
IRQ(Interrupt Request)
IRQ 是硬件设备向 CPU 请求服务的信号编号。
每一个外设(例如键盘、鼠标、硬盘)在需要 CPU 服务时,会通过某个 IRQ 线路 向 CPU 发出中断信号,CPU 处理这个中断,称为“中断服务”。IRQ 是“硬件视角”的编号,它最终会被映射成“软件中的中断号”(即 int N)。标准的IRQ如下:
| IRQ | Description |
|---|---|
| 0 | Programmable Interrupt Timer Interrupt |
| 1 | Keyboard Interrupt |
| 2 | Cascade (used internally by the two PICs. never raised) |
| 3 | COM2 (if enabled) |
| 4 | COM1 (if enabled) |
| 5 | LPT2 (if enabled) |
| 6 | Floppy Disk |
| 7 | LPT1 / Unreliable "spurious" interrupt (usually) |
| 8 | CMOS real-time clock (if enabled) |
| 9 | Free for peripherals / legacy SCSI / NIC |
| 10 | Free for peripherals / SCSI / NIC |
| 11 | Free for peripherals / SCSI / NIC |
| 12 | PS2 Mouse |
| 13 | FPU / Coprocessor / Inter-processor |
| 14 | Primary ATA Hard Disk |
| 15 | Secondary ATA Hard Disk |
PIC(Programmable Interrupt Controller)
最早的 PC 使用两个 8259A PIC(主从) 来管理 15 个 IRQ 通道(IRQ0 ~ IRQ15)。
- 主 PIC 处理 IRQ0 ~ IRQ7
- 从 PIC 处理 IRQ8 ~ IRQ15,并通过 IRQ2 接到主 PIC 的 IRQ2 上
异常向量对照表
| Int | Description |
|---|---|
| 0-31 | Protected Mode Exceptions (Reserved by Intel) |
| 8-15 | Default mapping of IRQ0-7 by the BIOS at bootstrap |
| 70h-78h | Default mapping of IRQ8-15 by the BIOS at bootstrap |
PIC 的控制端口(Port)
| Port | Description |
|---|---|
| 20h & 21h | control/mask ports of the master PIC |
| A0h & A1h | control/mask ports of the slave PIC |
| 60h | data port from the keyboard controller |
| 64h | command port for keyboard controller - use to enable/disable kbd interrupts, etc. |
I/O控制指令
outb / inb这两个是 x86 架构提供的底层 I/O
指令,用于与外设通信,比如:可编程中断控制器(PIC),定时器(PIT),键盘控制器,CMOS,甚至是串口、VGA
等等
outb(port, value)
- 作用:把一个字节(
value)写到某个 I/O 端口(port) - 汇编对应:
outb %al, %dx这里%al是 8 位寄存器,%dx是 I/O 端口号
1 | static inline void outb(uint16_t port, uint8_t val) { |
解释:
asm volatile (...): 告诉编译器这是内联汇编,且不要优化或重排序"a"(val): 把val放到eax/al寄存器"Nd"(port): 把port放到dx,或立即数(N表示 0–255 的立即数)
inb(port)
- 作用:从某个 I/O
端口(
port)读取一个字节 - 汇编对应:
inb %dx, %al
1 | static inline uint8_t inb(uint16_t port) { |
"=a"(ret): 将al中的值存到ret"Nd"(port):port放到dx或立即数
初始化 PIC 需要发 4 条命令(ICW1 ~ ICW4),ICW即Initialization Command Word:
| 控制字 | 用途 | 对应 outb() 调用 |
|---|---|---|
| ICW1 | 发起初始化 | outb(PICx_COMMAND, ICW1_INIT) |
| ICW2 | 设置中断向量偏移 | outb(PICx_DATA, 0x20 / 0x28) |
| ICW3 | 设置主从连接方式 | outb(PICx_DATA, 4 / 2) |
| ICW4 | 设置 PIC 模式(8086 模式) | outb(PICx_DATA, ICW4_8086) |
这些 必须按顺序喂给 PIC,否则它无法正确配置。
基本简单实现
1 | // idt.h |
1 | // idt.c |
1 | // isr.h |
1 | // isr.c |
1 | // screen.h |
1 | // screen.c |
1 | ; idt_flush.asm |
1 | ; isr_stub.asm |
1 | # Makefile |
1 | // kernel.c |
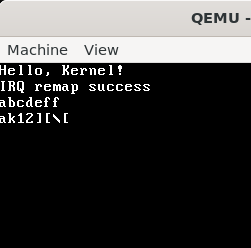
最后我们跑起来时就可以看到我们之前在isr.c中实现的isr_handler被调用了。首先是触发除零错误时跳转到isr0处处理,然后进入isr_handler进行打印调试信息。
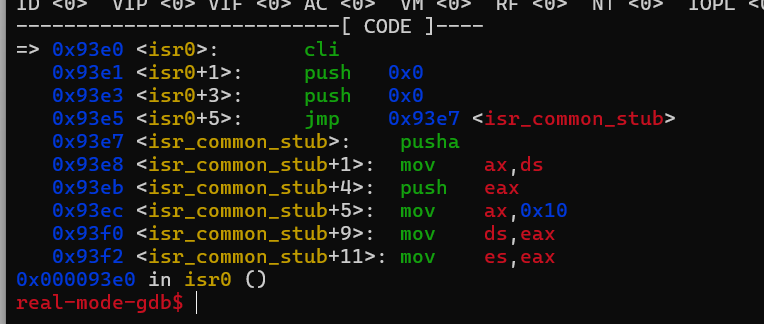

这里已经成功调用了我们写的回调函数,但是由于并没有处理除零后的行为,所以从回调函数返回时还会执行除零的这个操作,所以导致一直进行0号中断。
我们可以把实际的处理逻辑放在c语言中实现,那么就可以在汇编里统一将32个中断统一跳转到isr_common_stub中处理,最后设置好寄存器参数后,跳转到isr_handler进行分类处理。
1 | void isr_install() { |
1 | ; isr_stub.asm |
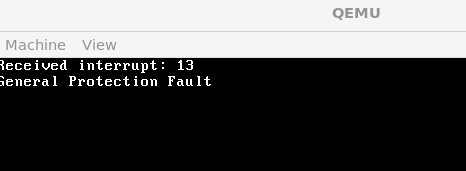
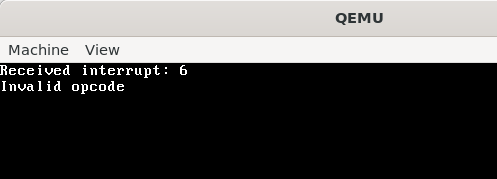
之后我们可以分别调用如下代码进行测试中断是否正常工作:
1 | void trigger_invalid_opcode() { |
IRQ 重映射
在 x86 架构中,前 32 个中断号(0~31)保留给 CPU 异常,而 PIC(Programmable Interrupt Controller,8259A)默认会将:
- IRQ0 映射到中断号 0x08(8)
- IRQ1 → 0x09(9)
- ...
- IRQ15 → 0x0F(15)
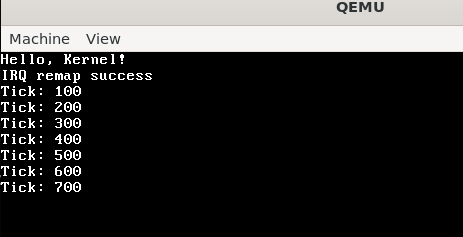
这就与 CPU 异常冲突了!所以必须把 IRQ 中断重新映射到 32~47(0x20~0x2F)或别的中断号,这样才可以自己处理它们,不会和异常冲突。这里可以通过4阶段的ICW来对PIC进行配置。
1 | // irq.c |
IRQ实现时钟与键盘处理
改进isr回调函数逻辑
之前我们采用硬编码的方式来注册与处理isr,这里我们想要扩展到IRQ的实现,并为了之后能够方便添加中断,这里对原来的isr.c进行一定修改来实现动态注册。
1 | // kernel/isr.h |
1 | // kernel/isr.c |
这里我把前面用到的outb以及inb单独提取出来放到common.h中声明实现,更加模块化。
1 | // include/common.h |
时钟实现
1 | // drivers/timer.h |
1 | // drivers/timer.c |
我们来详细看一下定时器具体如何设置:
1 | uint32_t divisor = 1193180 / freq; |
8253/8254 的输入时钟频率是 1.193180 MHz;
divisor = 1193180 / freq是设置定时器的分频器,比如你想让定时器每freq = 100Hz 触发一次中断,就要分频成:divisor = 1193180 / 100 ≈ 11931
1 | outb(0x43, 0x36); // PIT control |
0x43是 PIT 控制寄存器端口号;0x36是控制字,表示:- 通道 0(timer channel 0)
- 使用 先低后高字节模式写入分频值
- 模式 3:方波生成模式
- 二进制计数模式
1 | outb(0x40, divisor & 0xFF); // 写入低 8 位 |
0x40是 定时器通道 0 的数据端口;- 由于定时器的计数器是 16 位,我们需要把
divisor拆成 低字节 + 高字节 写进去; - 写入顺序:先低 8 位,再高 8 位(之前通过 0x36 控制字设置的)。
作用流程:
- kernel_main可以初始化阶段调用
init_timer(100)设置频率为 100Hz(即每10ms触发一次); - 设置好 PIT 芯片的工作模式和分频值;
- 注册了中断回调函数
timer_callback,绑定到了中断号 32(IRQ0); - 每10ms CPU 就会被硬件中断打断,自动跳转到
timer_callback执行,tick变量就会递增; - 每 100 次(1 秒)打印一次信息,说明定时器在工作。
然后在isr_install中加一条idt_set_gate(32, (uint32_t)irq0, 0x08, 0x8E);来注册这个中断,并在isr_stub.asm中加入以下代码来处理IRQ,同样也是跳转到isr_common_stub进行进一步处理:
1 | %macro IRQ 1 |
最后可以在irq_install中初始化时钟,并在kernel_main里调用irq_install。
1 | // kernel/irq.c |
1 | // kernel/kernel.c |
这里我们还定义了一个irq_handler,这个是为了区别cpu异常和硬件中断,因为硬件中断最后需要特殊处理,比如像要在处理完成过后向主从PIC发送PIC_EOI以表示中断处理结束,从而可以进行下一次处理。那么isr_handler也需要进行一定的更改。
1 | // isr.c |
键盘输入实现
1 | // drivers/keyboard.h |
1 | // drivers/keyboard.c |
1 | // kernel/irq.c |
1 | // kernel/isr.c |
之后加入别的IRQ也是这样一个修改流程,先写好对应的回调函数,然后在irq_install中调用注册回调函数的接口,最后在isr_install里用idt_set_gate来设置好IDT表项。
键盘底层是通过「扫描码(scancode)」和 CPU 交互的。
当你在键盘上按下一个键,比如
A,键盘控制器发送的是一个字节(称为
扫描码),而不是 ASCII 字符。比如:
A键按下时,对应的扫描码是0x1EB是0x30Enter是0x1CSpace是0x39
所以scancode_to_ascii[] 数组的作用是
把扫描码转换为可打印的 ASCII 字符。
键盘按下和抬起,都会触发中断。比如按下 A:
A按下:0x1EA抬起:0x9E(0x1E + 0x80)
我们通常只关心「按下时的动作」,所以用:
1 | if (scancode & 0x80) |
判断是否是抬起,如果是就跳过。
然后就可以正常从键盘读取输入,不过目前的版本并不能用shift切换大小写显示。
进行一下修改就可以实现显示shift转换后的内容
1 | unsigned char scancode_to_ascii_shifted[128] = { |
debug
加载顺序问题
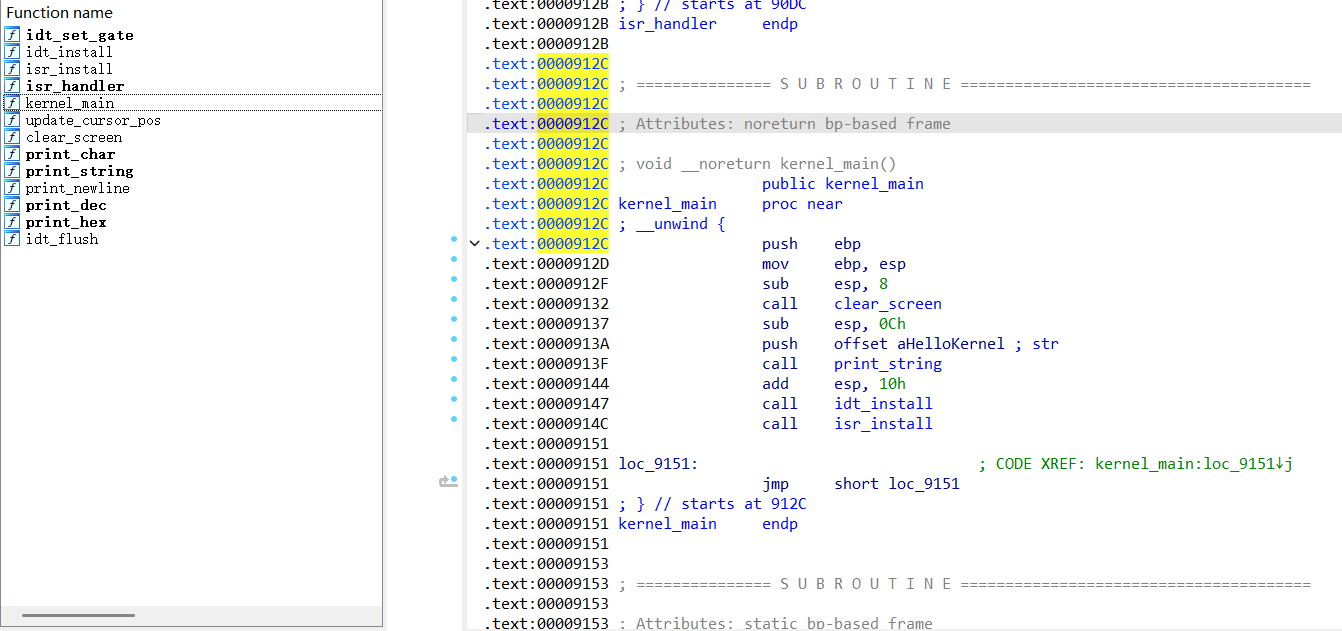
一开始我的makefile如下,结果每次跳转到0x9000位置,执行的好像都是别的代码,而没有进行call其它函数。
1 | DIR := $(shell pwd) |
然后用IDA看kernel.elf文件,才发现我们的kernel_main并没有正常的加载到0x9000的起始位置,所以我们前面都是跳转到idt_set_gate函数进行执行。所以会出现问题。
问题在于我们在指定目标KERNEL_OBJ时的顺序没有指定,这里的
$(KERNEL_SRC) 是由 wildcard 自动搜集
.c 文件,而 wildcard 的顺序是按文件名
ASCII 排序来的,不保证 kernel.c(含有
kernel_main())是第一个。而ld只会按参数顺序进行加载。
1 | KERNEL_SRC := $(wildcard $(KERNEL_DIR)/*.c) $(wildcard $(DRIVER_DIR)/*.c) |
简单的更改方式是把kernel.o单独拿出来:
1 | KERNEL_OBJ := $(KERNEL_DIR)/kernel.o $(filter-out $(KERNEL_DIR)/kernel.o, $(KERNEL_SRC:.c=.o)) $(ASM_OBJS) |
磁盘预留空间问题
当我们的kernel.bin比较大时,我们可能之前手动指定的5个扇区长度就不够用了,会导致部分函数没有加载到内存。解决方式有两种,手动的方式是用
size kernel.elf
看总共占的大小,然后再算出需要的扇区数。
自动计算扇区数并加入软盘方式如下,需要更改makefile最后生成TARGET软盘文件的逻辑:
1 | $(TARGET): $(BOOT_BIN) $(STAGE2_BIN) $(KERNEL_BIN) |
timer无响应
由于我的isr_handler设计上是只要接受到中断就先打印中断号,所以如果屏幕上没有打印任何内容,说明并没有接受到外部中断。
首先是需要在加载完irq以及isr后手动用sti开启中断,sti
是 x86 指令,用于设置 中断标志位 IF(Interrupt
Flag),允许 CPU 响应硬件中断(IRQ)。
其次我们需要单独为irq实现一个handler,因为在 IRQ 的中断服务程序(IRQ handler) 中,必须手动发送 EOI 给主/从 8259A PIC,否则 PIC 会认为该中断尚未处理完成,从而 不会发出新的中断请求。
之后遇到的问题是跳转后好像指令没有加载出来,发现问题可能在于我们之前boot.asm中映射空间大小写死为读取5个扇区,而这里我们的kernel已经超出了5个扇区的大小了,所以最后只加载了一半。那么我们在boot.asm中多申请点读取扇区大小即可。
- 标题: 从零开始搭建自制操作系统——中断管理
- 作者: collectcrop
- 创建于 : 2025-05-08 10:54:55
- 更新于 : 2025-05-08 10:55:45
- 链接: https://collectcrop.github.io/2025/05/08/从零开始搭建自制操作系统——中断管理/
- 版权声明: 本文章采用 CC BY-NC-SA 4.0 进行许可。
